Market News October 27, 2017

Nevada Real Estate Market Update


ECONOMIC OVERVIEW

Employment in the Las Vegas metropolitan area continues to moderate from the substantial growth of the past few years, but the region still experienced impressive annual employment growth of 3%. The market has added 28,400 new jobs over the past 12 months. With this growth in employment, the unemployment rate came in at 5.2%.
Las Vegas continues to grow its job base. This has led to solid growth in the civilian labor force, which is now at an all-time high. Given the fact that the area is approaching full employment, I expect to see wages rise at above-average rates. This will allow home price growth to continue, for the time being.


HOME SALES ACTIVITY

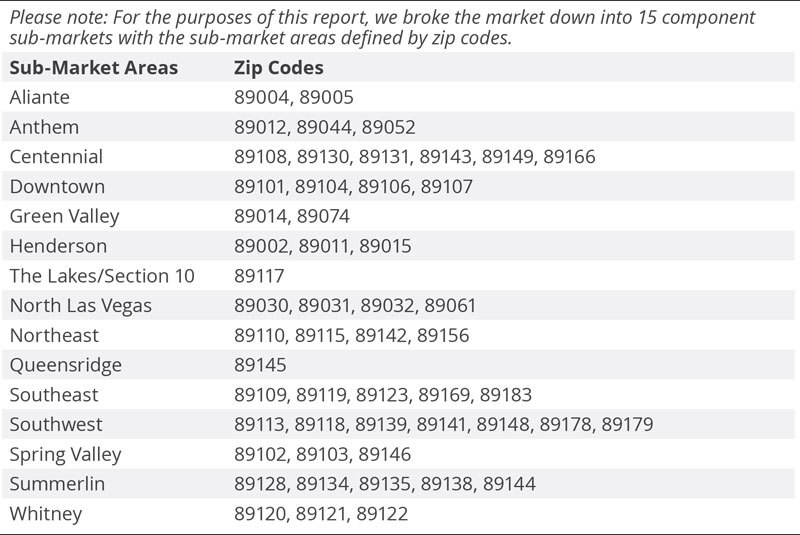
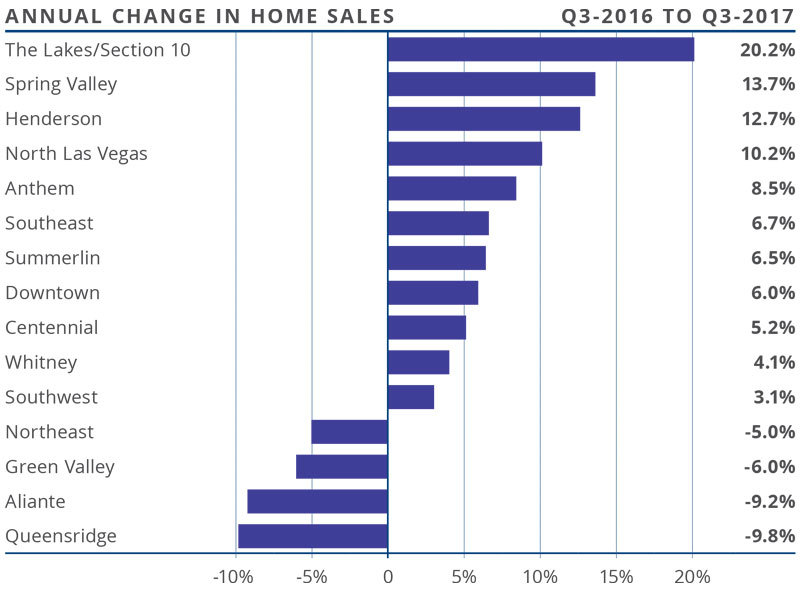
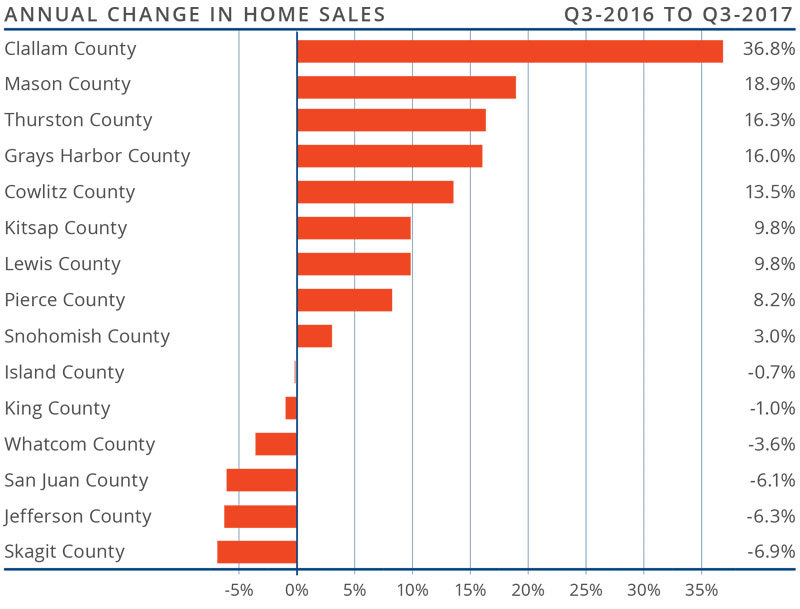
  • A total of 10,018 homes sold in the third quarter, which was an increase of 5.3% over the same period a year ago. With a solid 7.6% increase in pending sales, a strong number of closings are expected to occur in the fourth quarter.
  • Home sales were not as strong in the Queensridge and Aliante sub-markets, but this is due to very low inventory levels rather than a drop in demand.
  • Sales rose substantially in several of the sub-markets within this report, but the greatest increase was seen in The Lakes/Section 10 market area, which saw an annual increase of 20.2%.
  • Inventory levels remain remarkably low, with 36.3% fewer homes for sale than the same period in 2016. Listing activity is unlikely to grow in the fourth quarter, so the market will remain out of balance.


HOME PRICES

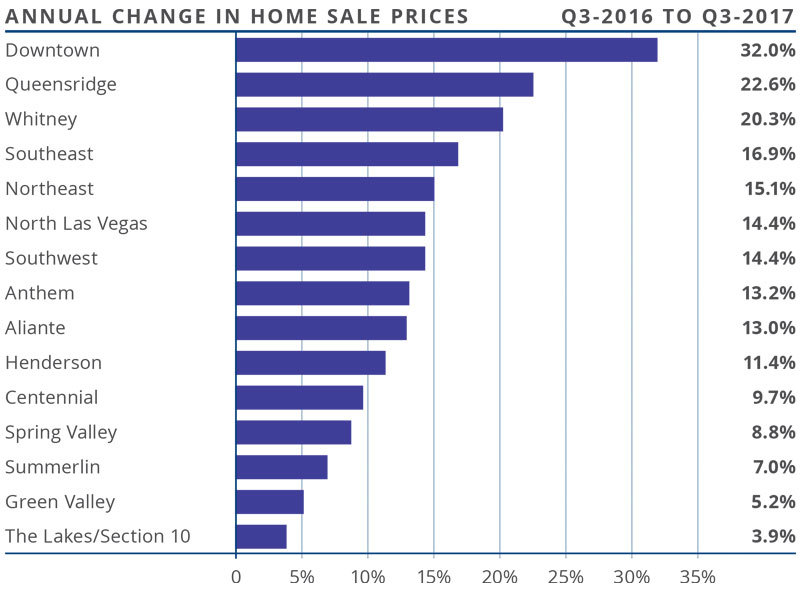
  • Home prices in the area have risen by 12.7% year-over-year, to an average of $268,958.
  • Double-digit gains were seen in an additional eight neighborhoods, and only five sub-markets saw prices rise by less than 10%.
  • Prices rose in all sub-markets compared to the third quarter of 2016. The strongest growth was in the more-affordable Downtown sub-market, where prices were up by 32%.
  • I continue to believe that we will see above-average price growth in the greater Las Vegas market as robust job growth continues and inventory levels remain very constrained.


DAYS ON MARKET

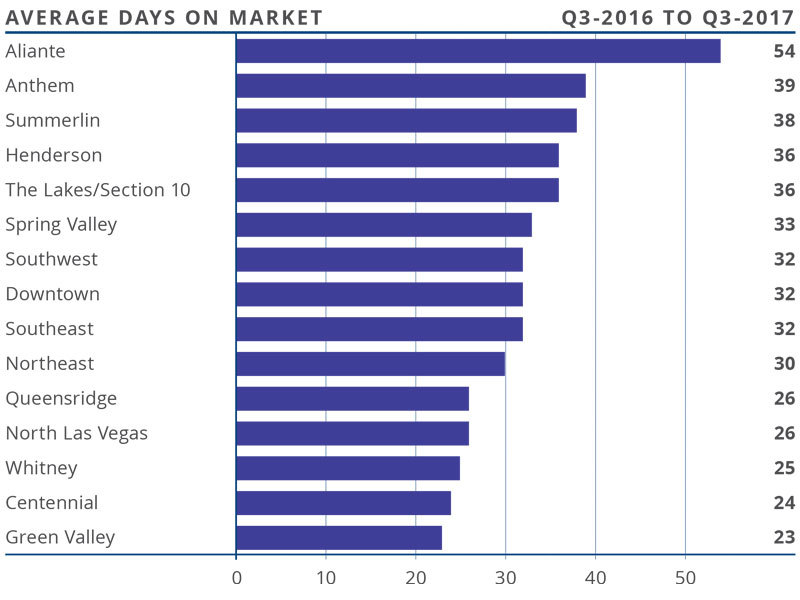
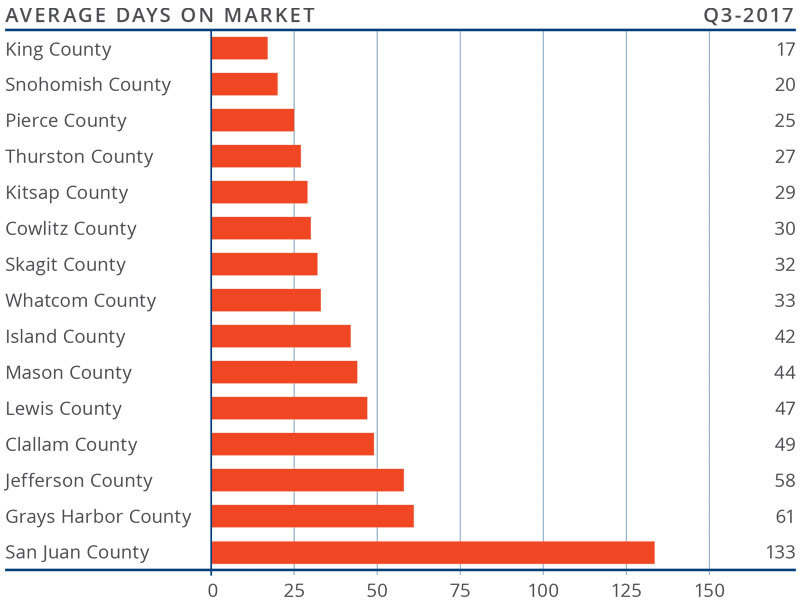
  • The average time it took to sell a home in the region dropped by 19 days compared to the second quarter of 2016.
  • It took an average of just 32 days to sell a home in the third quarter.
  • The length of time it took to sell a home dropped in all the Las Vegas sub-markets compared to a year ago.
  • The greatest drop in days-on-market was in the Aliante sub-market, which dropped by 40 days when compared to the same quarter in 2016.


CONCLUSIONS

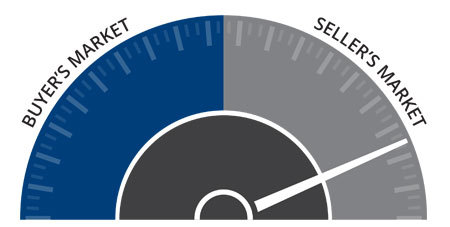
The speedometer reflects the state of the region’s housing market using housing inventory, price gains, home
sales, interest rates, and larger economic factors. Employment growth in Clark County, although slightly less robust than in the second quarter, is still gaining strength. This, in concert with low inventory levels and competitive mortgage rates, will lead to continued above-average price growth. Given these factors, I have moved the speedometer a little further in favor of sellers.


Matthew Gardner is the Chief Economist for Windermere Real Estate, specializing in residential market analysis, commercial/industrial market analysis, financial analysis, and land use and regional economics. He is the former Principal of Gardner Economics, and has more than 30 years of professional experience both in the U.S. and U.K.


If you are in the market to buy or sell, we can connect you with an experienced agent here.

Market News October 26, 2017

Western Washington Real Estate Market Update


ECONOMIC OVERVIEW

The Washington State economy added 79,600 new jobs over the past 12 months—an impressive growth rate of 2.4%, and well above the national growth rate of 1.2%. However, as we anticipated in last quarter’s report, we continue to see a modest slowdown in the growth rate as the state grows closer to full employment. Growth has been broad-based, with expansion in all major job sectors other than Aerospace (a function of a slowdown at Boeing). Given the current rate of expansion, I am raising my employment forecast and now predict that Washington will add 81,000 new jobs in 2017.

Given the robust job market, it is unsurprising that the state unemployment rate continues to fall. The current unemployment rate in Washington State is 4.6% and we are essentially at full employment. Additionally, all counties contained within this report reported either a drop or stability in their unemployment rate from a year ago. I maintain my belief that the Washington State economy will continue to outperform the U.S. as a whole. Given such a strong expansion, we should also expect solid income growth across Western Washington.


HOME SALES ACTIVITY

  • There were 25,312 home sales during the third quarter of 2017. This is an increase of 3.6% over the same period in 2016.
  • Clallam County maintains its number one position for sales growth over the past 12 months. Only four other counties saw double-digit gains in sales. This demonstrates continuing issues with the low supply of listings. There were modest declines in sales activity in six counties.
  • The market remains remarkably tight with listing inventory down by 14.2% when compared to the third quarter of 2016. But inventory is up a significant 32% compared to the second quarter of this year. Pending sales rose by 5.2% over the same quarter a year ago, which suggests that closings in Q4 will still be robust.
  • The key takeaway from this data is that inventory is still very low, and the situation is unlikely to improve through the balance of the year.


HOME PRICES

  • Given tight supply levels, it is unsurprising to see very solid price growth across the Western Washington counties. Year-over-year, average prices rose 12.3% to $474,184. This is 0.9% higher than seen in the second quarter of this year.
  • With demand far exceeding supply, price growth in Western Washington continues to trend well above the longterm average. As I do not expect to see the new home market expand at any significant pace, there will be continued pressure on the resale market, which will cause home prices to continue to rise at above-average rates.
  • When compared to the same period a year ago, price growth was most pronounced in Grays Harbor County where sale prices were 20.1% higher than the third quarter of 2016. Nine additional counties experienced double-digit price growth.
  • Mortgage rates in the quarter continue to test the lows of 2017, and this is unlikely to change in the near-term. This will allow home prices to escalate further but I expect we will see rates start to rise fairly modestly in 2018, which could slow price growth.


DAYS ON MARKET

  • The average number of days it took to sell a home in the quarter dropped by eight days when compared to the same quarter of 2016.
  • King County continues to be the tightest market, with homes taking an average of 17 days to sell. Every county except San Juan saw the days on market drop from the same period a year ago.
  • This quarter, it took an average of 43 days to sell a home. This is down from the 51 days it took in the second quarter of 2016 and down by 8 days from the second quarter of this year.
  • At some point, inventory will start to grow and this will lead to an increase in the average time it takes to sell a house. However, I do not expect that to happen at any time soon. So we remain in a seller’s market.


CONCLUSIONS

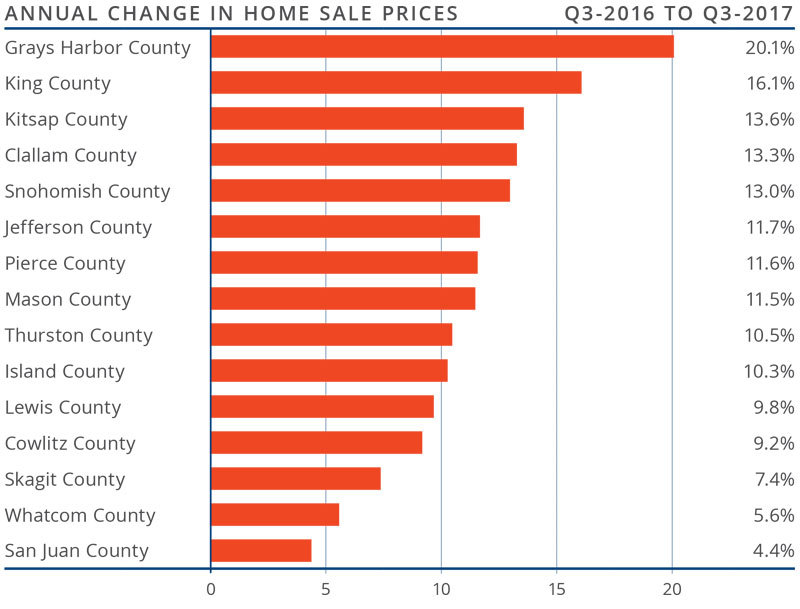
This speedometer reflects the state of the region’s housing market using housing inventory, price gains, home sales, interest rates, and larger economic factors. For the third quarter of 2017, I have left the needle at the same point as the second quarter. Though price growth remains robust, sales activity has slowed very slightly and listings jumped relative to the second quarter. That said, the market is very strong and buyers will continue to find significant competition for accurately priced and well-located homes.


Matthew Gardner is the Chief Economist for Windermere Real Estate, specializing in residential market analysis, commercial/industrial market analysis, financial analysis, and land use and regional economics. He is the former Principal of Gardner Economics, and has more than 30 years of professional experience both in the U.S. and U.K.


If you are in the market to buy or sell, we can connect you with an experienced agent here.

More October 23, 2017

How to Decide Where to Put the Toilet in Your New Bathroom

From the beginning of your bathroom renovation, your plumbers and framers need to know where your toilet should go — whether it’ll be mounted on the floor or wall and where the water supply should be positioned. If that’s not complicated enough, wall paneling, tile installation, shower doors and baseboards will all factor into the equation for your toilet location, too.

Don’t feel overwhelmed — finding the right professional can help you get through the technical stuff, and having a handle on these tips and tricks can help you find a spot for your toilet that works for you and your bathroom’s design.


Toilet 1: Enviable Designs Inc, original photo on Houzz


Take Note of Wall Panels and Baseboards

Most toilets are roughed-in 12 inches from the finished wall. This works well for most floor-mounted toilets.

Tip: Some toilets require floor anchoring clips — another limiting factor because it can interrupt radiant heating. Talk with your floor heating contractor before choosing this type of toilet to make sure that the anchors won't mess with water lines or heating cables.


Toilet 2: kbcdevelopments, original photo on Houzz


What a classic bathroom — I love it. The look and feel of the toilet fits in with the baseboard and crown molding perfectly. I would guess the baseboard wraps behind the toilet for a seamless look.

Tip: It’s very hard to paint behind toilet tanks like this. I suggest painting the wall and installing the baseboard before putting the toilet in.


Plan Out Your Shower First

If you’re planning on having a barrier-free shower near your toilet, consider installing a wall-mount toilet to make waterproofing measures simpler for your contractor.


Toilet 3: Beyond Beige Interior Design Inc, original photo on Houzz


Shower doors also play a role in your toilet’s location. To meet building codes, a shower door needs to open both in and out, so you’ll want to take the door swing into account when choosing your toilet spot.

Tip: Work with your contractor to play with different toilet and door locations when finalizing your shower’s size. Use a piece of string and a marker to draw an arc on the floor to show the door swing. This will help you visualize where a toilet can fit comfortably.


Decide on a Wall Mount or Floor Mount

Installing a wall-mount toilet is a chore. All of them require a wall carrier to support the toilet, and some have very exact water supply positions, which allows for little flexibility in location. However, the look is seamless and modern and has some functional benefits as well.

Tip: A standard toilet is 14 to 15 inches high from the finished floor to the top of the bowl (excluding the fold-down seat). Consider a higher measurement of 16 to 18 inches for your wall-mounted toilet if you plan on aging into your golden years. It may seem high now, but you'll be thankful for the added height later.


Toilet 4: kbcdevelopments, original photo on Houzz


Wall-mounted toilets are great for smaller spaces because the tank is inside the wall. In this installation, you can see that the builder brought the wall forward for this wall-mounted toilet's water carrier to create a ledge above the sink and toilet for the flush activator. Usually these ledges are larger, and I love the smaller version here.


Toilet 5: Fixture Universe, original photo on Houzz


During installation, most toilets are dropped in over two bolts and the bolts are trimmed and capped to keep the toilet in place. Many clean line toilets (which are great for easy cleaning) have separate mounting blocks, and the toilet is screwed into place from the two sides. This Duravit toilet has those great clean lines, but the same easy installation as a regular toilet.

Tip: We have a 10-flush rule with any new toilet. After it’s installed but before using any silicone, we flush the toilet 10 times back to back to make sure everything’s functioning properly.

Note that floor-mounted and wall-mounted toilets come in regular and elongated versions. If you're tight on space, look for a regular or smaller model.


Toilet 6: Bill Fry Construction – Wm. H. Fry Const. Co., original photo on Houzz


Pay Attention to Any Recesses or Compartments

In this photo, the recessed shelves above the toilet allow for more headroom and save space. This clever use of space was no doubt made possible by good planning. Make sure your entire building crew knows about spaces like this ahead of time for a successful build.

Tip: Check that your builders spray paint the framing around these niche locations before any wires, pipes or insulation is installed.

If you are planning a toilet compartment, the NKBA recommends a space about 36 by 66 inches, with a 32-inch-wide doorway. The absolute minimum would be 30 by 60 inches, which leaves just 15 inches of space on either side of the toilet rough-in.

Tip: If you're worried about the bottom of your toilet scratching your floor tile or hardwood during installation, consider using scraps of Kerdi waterproofing membrane on the bottom of the toilet. Anything that will stick to the toilet bottom — extra peel-'n-stick tiles, scraps of linoleum, etc. — can work.


By JW, Houzz

Living October 18, 2017

When Things Go Bump in the Night

It’s almost Halloween; the time of year when people decorate their homes with haunting embellishments and spooky décor. Bats, spiders, and rodents are all good and fun when they’re made of plastic, but when you have the real thing taking up residence in your home, it’s no treat. Here are some tips for making sure these frightening critters don’t make your house their permanent home.


Blood Suckers

While they may not turn into vampires in real life, preventing a bat infestation is actually good for your health. That’s because bats are a known carrier of rabies and an accumulation of their droppings can cause lung problems in humans. Bats can enter your home through holes less than an inch wide, and when they do, they often find the attic to be very accommodating to their needs. So, how do you keep them from settling in? Start by checking your roof and siding for any gaps. Check your attic for any signs of infestation, including: brown stains around any openings in your siding or roof (from oil on their skin), droppings, or strange sounds coming from the attic. Ghosts aren’t the only ones who like it up there.


To prevent or rid your home of bats follow these tips:

  • Get rid of the bats now, so they can find alternative shelter before hibernation season in the winter.
  • Check with local pest control companies; in some states it is illegal to exterminate bats.
  • Locate the point of entry.
  • Hire a professional to evacuate the bats.
    • As mentioned above, bats can cause health problems; hire a professional who has experience and the right equipment. There are humane options available.
  • Prevent re-entry by sealing any openings.
  • Use mothballs to prevent re-nesting. Bats have a tendency to return to previous nesting sites, so this may need to be repeated.


Creepy Crawlies

In lists of common phobias, more than thirty percent of adults report fearing spiders, right behind public speaking and death. Most spiders that you find in your home are perfectly harmless; however, that doesn’t mean you want to share your space with them. To be on the safe side, there are some measures you can take to protect yourself from our little eight legged friends. Even a bite from a harmless spider can cause infections with itchy, red skin. In most cases, it can be treated by washing it with cool, soapy water, elevation, and an ice pack. Of course, if it shows signs of getting worse, your next step should be calling your doctor. Spider varieties that you should avoid include: Hobo spiders, Black Widows, Brown Recluses, and the Yellow Sac spider. These spiders are poisonous and can cause a number of symptoms from vomit to necrotic lesions. According to experts, spiders very rarely cause death in humans; however, if you are bit by a venomous spider you should seek immediate medical attention (and bring the spider remains with you, if possible).


Here are some tips to reduce spiders in your home:

  • Kill spiders on sight.
  • Place non-poisonous spider traps with non-toxic attractants and glue in areas where spiders are commonly found and in corners.
  • Be careful with common insect repellent and spider sprays, these can be toxic and harmful to children and pets.
  • Spiders can be deterred with essential oils: lavender, chestnut, clover leaf, and coconut.
  • Use ultrasonic devices.


Rodents:

The most effective way to prevent mice and rat infestation is to keep them out of your home in the first place. Mice can get through a gap as small as a quarter of an inch, so thoroughly inspecting the foundation and interior of your home for entrance points and sealing any cracks or holes is a great way to start. Rodents are also excellent at tracking food sources. Keep all food, including pet food and pantry items in secure bins and jars.

If you have found evidence of mice or rats (generally droppings or urine) take caution. Rodent secretions can be hazardous, and can spread salmonella or hanta virus. There are multiple methods for removing rodents from your home, including traps, poison bates, electronic and sonic devises and, a house cat, or professional exterminator.


If you are getting rid of the critters on your own you will want to follow these steps:

  • Identify their food source(s), entry points, and common routes around and through your home.
  • Remove food source with secure packaging that cannot be chewed through, such as glass containers.
  • Seal all entry points with wire mesh.
  • Place sonic devises, traps, poison, or other deterrents in the pathway of the rodents.
  • Use caution, make sure poison or exposed traps are not accessible to children or pets.
  • If you find urine, droppings, or a dead mouse you will want to spray the surface and mouse with a bleach/water solution. Using gloves and a face mask, remove the rodent and wipe all surfaces.
  • If you have identified a large quantity of rodents, contact a professional for removal and clean up.
  • You may need to take extra measures to ensure the removal is permanent by changing components of your back yard, replacing siding, or upgrading building materials to prevent outdoor nesting and re-infestation.


Image courtesy of Stuart Miles at FreeDigitalPhotos.net

More October 9, 2017

6 Dramatic Exterior Makeovers to Inspire Your Own

Upgrading your home’s exterior has many benefits, not the least of which is a nice welcome home every day. Whether you freshen up your finishes, add a new garage door or redo your landscape, there are many ways to elevate your home’s curb appeal. These six before-and-after projects offer a sample of what can be done. See the exteriors, then take a look at the rest of each home.


Exterior 1: Before Photo, original photo on Houzz


1. Decatur, Georgia

BEFORE: When the homeowners bought the property in Decatur, Georgia, the brick exterior was buried beneath a layer of stucco. The columns, pediment and bay window felt as though they’d been imposed on the structure, which didn’t have the scale to carry off such details, designer and builder Ili Hidalgo-Nilsson says.


Exterior 2: Terracotta Design Build, original photo on Houzz


AFTER: The design-build team simplified the exterior detailing and replaced the bay window with French doors and French balconies. They updated the electrical and plumbing, replaced the windows, and added insulation throughout.


Exterior 3: Before Photo, original photo on Houzz


2. Baton Rouge, Louisiana

BEFORE: For this 1939 Colonial Revival house in Baton Rouge, Louisiana, the front yard’s previous circular driveway was removed and replaced with a grass lawn to create a more natural curb appeal.


Exterior 4: TY Larkins Interiors, original photo on Houzz


AFTER: The custom shade of white paint selected for the home’s exterior was inspired by the shade of white often found on buildings in Paris. “It has this antique, earthy quality to it that’s timeless,” designer Ty Larkins says. The home’s front windows also received functioning shutters that helped bring it back to its Colonial Revival roots.


Exterior 5: Before Photo, original photo on Houzz


3. Chevy Chase, Maryland

BEFORE: Homeowners Di Bruning and David Owen felt that the exterior of the 1968 house in Chevy Chase, Maryland, had a somewhat oppressive look. However, the lot, which slopes up from the street, afforded a spacious two-level floor plan, with the garage, family room and a bedroom built into the hillside on the first level, and the kitchen, dining room, living room and four bedrooms upstairs.


Exterior 6: Balodemas Architects, original photo on Houzz


AFTER: Architect Lou Balodemas updated the home’s curb appeal by installing a new entry door and sidelights; new windows, including an enlarged opening for the second-floor living room; new fiber cement siding for the upper level; and a new garage door. “The original entry door was a bit recessed,” Balodemas says, “so we popped it out to give the foyer a few more feet of space.” He also added a new front walkway to create a grander approach to the house.

Related: Stylish New House Numbers to Bump Up Your Curb Appeal


Exterior 7: Before Photo, original photo on Houzz


4. Berkeley, California

BEFORE: Here’s a look at the overgrown landscaping at the front of Geoff Lomax and Sabina Aurilio’s home in Berkeley, California. The wooden retaining walls were starting to fail, and the foundation was showing signs of sinking.


Exterior 8: Mediterranean Exterior, original photo on Houzz


AFTER: The yard was dug out and the landscaping replaced with new drought-tolerant plantings. The foundation was ripped out and replaced. The stucco was redone and repainted, and new lightweight shingles that fit with the Mediterranean style of the home were added.


Exterior 9: Before Photo, original photo on Houzz


5. Palm Springs, California

BEFORE: Though the exterior of the 1958 home in Palm Springs, California, was in OK shape, parts of the ceiling were caving in, most of the windows were broken, and the home hadn’t been cleaned in years.


Exterior 10: H3K Design, original photo on Houzz


AFTER: Kevin Kemper and Howard Hawkes of H3K Design preserved the facade, including the “sun flap,” a common element used in the 1960s to keep sunshine from hitting inside the house and heating it up too much.

They took the rest down to the studs, then added new stucco, plumbing, electrical work, insulation and a new roof. “It was a big preservation effort on our part,” Kemper says. “There was some unusual architecture, and we were afraid someone would tear it down or alter it and you wouldn’t be able to recognize the home.”


Exterior 11: Before Photo, original photo on Houzz


6. St. Paul, Minnesota

BEFORE: The home had a 22-by-7-foot enclosed porch across the front that created an uninviting entrance. Fake brick asphalt shingles covered one portion of the home. “Close up, the fake brick asphalt was pretty nasty,” architect David Strand says. “The house was very true to what it was, but it was dirty and it went beyond what the owner was able to do with it.”


Exterior 12: Strand Design, original photo on Houzz


AFTER: Strand removed the enclosed front porch and added an open porch with three columns that hold up the extended white roof. “It’s nice to be able to sit on an open porch and have that neighborhood feel,” Strand says. “This returns the house to the original concept, which was important.”

He also eliminated the fake brick asphalt shingles. A trim band breaks up the house, creating a two-tone look with warm white on top and a gray with green tones on bottom. “I love dark houses,” Strand says. “It was nice to have a white urban farmhouse but also have a bit of a modern feel.”


By Bryan Anthony, Houzz

More October 2, 2017

Perk Up Your Home’s Exterior With a Splash of Green

If our recent profile of homes with bold blue accents wasn’t your speed, this week we take a look at houses that sport a splash of green. Whether you choose a softer, more neutral green that picks up hues in your landscape or you go for a bright hue, first consider the following examples of how to work in a green accent to the exterior, along with paint color palettes to try out on your own home.

Related: Pick the Perfect Shades of Green for the Exterior


Green Exterior 1: Jason Snyder, original photo on Houzz


This dazzling tropical green would be a bit much for the entire house, but when it’s used in smaller bits and paired with a couple of milder neutrals, it’s fun and vibrant without going overboard.

For a similar palette, try: Storm Cloud with trim in Ice Cube and an accent of Leapfrog, all from Sherwin-Williams.


Green Exterior 2: Peter Zimmerman Architects, original photo on Houzz


If it’s a softer green you’re after, look at shades that have a good bit of gray or brown in them, which helps neutralize them. The herbaceous green used for the shutters here is a nice accent color. It doesn’t fight with the architecture or landscaping, but rather ties everything together.

For a similar palette, try: Belvedere Cream with trim in Swan Wing and an accent of Athenian Green, all from Behr.


Green Exterior 3: Design Living Studio, original photo on Houzz


Lovers of vivid color may want to give amped-up lime green a go. Nobody will miss your front door if it’s painted this zesty hue. The chunk of dark blue-gray and expanse of clean white perfectly balance the bit of bold at the door.

For a similar palette, try: White Diamond with accents of Westcott Navy and Electric Slide, all from Benjamin Moore.


Green Exterior 4: Brandon Construction Co Inc, original photo on Houzz


Salute the summer sun by painting your home a happy yellow. White trim adds crispness and doesn’t distract your attention from the fun olive green accent color.

For a similar palette, try: Chapel Wall with trim in Cloud White and an accent of Thai Basil, all from Kelly-Moore.


Green Exterior 5: Trapolin-Peer Architects, original photo on Houzz


If you’re struggling with selecting a color palette for the exterior, take a look at the hardscape elements on or around your home, such as stone pavers, and pull some colors you like from them.

A soft tan or taupe is a popular, tried-and-true exterior color that happens to make a terrific background hue to a more unusual accent color, such as this deep, elegant green.

For a similar palette, try: Whiskers with trim in Gray Palomino and an accent of Smoky Emerald, all from PPG Pittsburgh Paints.

Related: Not Sure About Taupe? Try Beige Instead


Green Exterior 6: Johnston Architects, original photo on Houzz


Bold, contemporary architecture deserves an equally bold and contemporary color palette. Take it to the limit with an extra-vibrant green. The small sliver of black trim is striking against the gray and green, and it helps define the different elements on the home’s exterior.

For a similar palette, try: Vessel Gray with trim in Very Black and an accent of Mountain Botanical, all from Valspar.


By Jennifer Ott, Houzz

LivingSelling September 27, 2017

Getting Organized Is Good for Your Home and Your Health


For the last nine years, the HomeGain National Home Improvement Survey has been asking real estate professionals across the country the same question: What are the top 10 things a homeowner can do to get their home ready to sell?


And every year, the number one answer is: clean and de-clutter. In the latest survey, 99 percent of the real estate professionals queried ranked this task the most important. What’s more, they estimated that, for every dollar spent on the task, the homeowner would receive a whopping 403 percent return on their investment.


De-cluttering delivers big benefits to those who are not selling their homes, too. Studies show that living in a cluttered house is mentally stressful for the occupants and often leads to weight gain and other health problems.


So why do so many of us put off this important task? It’s hard work. It takes time. It’s physical. It’s emotional. And there are lots of decisions to make about what goes where, what gets tossed, and more. Worst of all, thinking about it makes it seem like an even bigger project than it really is—which is why experts say the best way to get started is to simply jump in.


The easy way to get started

The toughest part of getting organized is getting started. It’s too easy to say, “I’ll go through that closet later.” “I’ll get rid of those boxes later.” “I’ll donate those clothes later.”


Instead, replace “later” with “now.”


Grab a couple cardboard boxes and spend 90 minutes right now organizing one part of one room (a desk in your study, for example). Once you see that it’s not nearly as tough as you imagine, and actually feels satisfying and freeing, you’ll become energized and ready to take on even bigger organizing tasks tomorrow.


Here are some tips to keep you on track:


  • Tackle one room at a time.


  • Start with the easy stuff. Rounding up the things you know you want to toss, recycle, sell, or store.


  • Finish the task you start. Don’t pull everything out of a closet, for example, and then stop for the day, leaving the mess for later. Finish organizing the closet.


  • Get the whole family involved (these are important life lessons to pass along to your children).


  • Let phone calls and other disruptions wait until you’re done for the day.


Deciding what to keep

Once you make your way through the things you know you don’t want any more (broken appliances, unused gifts, outdated electronics, store returns, etc.), then it’s time to focus on the items that are useful, but don’t get used very often. Experts suggest two strategies. Choose the one that works best for you, or try using them in combination:


  • The 12-month test – If you haven’t used the item in the last year, get rid of it.


  • The cardboard box drill – Put items you’re not sure about in a cardboard box and set it aside. Whatever gets pulled out and used over the next two months can stay. The things that don’t get rescued should be sent packing.


How to handle keepsakes

Now for the toughest decision of all: What to do with those trophies, mementos, greeting cards, photos, kids’ art projects—and all the other things that trigger strong memories and emotional reactions.


First, go through these things and make sure they’re still things you want to keep. Some items may now remind you of a time—or a person—you want to forget.


Spend no more than 30 seconds reviewing each item. If you allow yourself to start wandering down memory lane, your organizing work will come to a screeching halt.


Take photos of items that are bulky or hard to store—especially the kids’ artwork, which tends to fall apart over time, anyway. Once you’ve captured the item in a photo, let the original go.


If there are keepsakes you inherited from your parents or relatives that hold no sentimental value for you, it’s time to say goodbye.


Stop saving so many things for your children. No matter what they say now, your kids will most likely only be interested in a few key mementos when they’re older. Designate a single memento box for each child.


Other people’s belongings

You should not be storing anything that doesn’t belong to you and/or the other current members of your household. Give back things you’ve borrowed. Get rid of the belongings of ex-spouses, ex-boyfriends, and ex-roommates. Get tough with your adult children; your days of providing a roof for their belongings are over.


Working with a professional

A professional organizer can teach you the tricks of the trade, help you make tough decisions about what to keep and what to let go, and consult with you about the best storage systems. Hiring a professional is also a good idea if you’re having trouble getting started or sticking with it. Expect to pay around $50 to $90 per hour for this kind of help.


Some final words of advice

While you’re getting organized, do not allow yourself to buy any non-necessities. Groceries, yes. But say no to clothes, toys, electronics, sporting goods, and other feel-good purchases.


When you’re done organizing, a good rule of thumb is that for every new item brought into the house, an old one has to leave.

More September 20, 2017

New Home Construction

BuyingSelling September 18, 2017

I’m Ready To Downsize But How Do I Start?

By June Griffiths


Are you thinking about downsizing but don’t know how to make the tricky transition work? How do you buy a new place before you sell your current home?


You are not alone as many home owners have the same concerns. They want to embrace a new lifestyle, take advantage of our ever-increasing values, and lock in a smaller home or condo in an area that they covet.


Below are some creative solutions that may help you make your dreams come true too. Keep in mind that everyone’s financial profile is different. One option might not work for you while another one will. It might even be a combination of a few of these.


Here are a few ideas:

HELOC – Home Equity Line of Credit. If you have enough equity in your current home, you may be able to get a HELOC to get a down payment for a conventional loan or to buy the new property outright.


Bridge Loan – These loans can bridge the gap between buying and selling. You can typically borrow up to 65% of the equity in your home with a maximum loan of $500,000.


Margin Loan – most individuals can borrow up to 50% of the balance in their liquid investment accounts (retirement accounts cannot be used). These loans are generally cheaper than a bridge loan and have no major tax implications.


IRA Rollover – Most retirement funds allow a 60 day rollover of funds. It’s very important to know that these funds must be replaced into the retirement account within 60 days or you may incur significant penalties and taxes.


Making a move, whether you are buying a larger home or downsizing out of your now empty nest, is a big decision. You’ll want the best professionals to help you. Ask your real estate agent to put you in touch with a lender who will help evaluate your financial situation and customize the best options for you.


June Griffiths is a Managing Broker in the Windermere Issaquah office and has worked in real estate since 1989. She can be contacted at june@windermere.com.

More September 13, 2017

Angels In The Cockpit


The following article appears in the August issue of Alaska Airline’s inflight magazine, Alaska Beyond, and features Windermere CEO, Geoff Wood, who currently serves as the Chairman of the Board of Angel Flight West, an organization whose volunteer pilots fly families in need of vital medical treatment.


Volunteer effort flies thousands of patients in need—for free

As Geoff Wood recalls his most memorable mission with Angel Flight West, he thinks back 10 years, to one of his first flights for the nonprofit that coordinates private pilots, in their own aircraft, to transport people in need. Wood, CEO of Windermere Services Company, volunteered to fly a Spokane man home from Seattle, where his daughter had undergone a bone-marrow transplant. The father was obviously upset about leaving his daughter behind. When their flight arrived in Spokane, Wood was scheduled to return to Seattle with a grandmother and her granddaughter, who was in need of medical treatment. Wood dropped off the father, picked up his new passengers and was taxiing his Cessna back to the runway when the tower asked him to return to the terminal. The father had received a call: His daughter had taken a turn for the worse, and he needed to get back to Seattle.


“Fortunately, I was able to get all three passengers back to Seattle, where they needed to be,” Wood says.


He recalls an old slang term among pilots called the $100 hamburger. Private pilots often look for an excuse to get out and fly, even if it means just flying to another airport, having something to eat, and flying home. In 1983, a small group of pilots in Santa Monica, California, figured there ought to be more to those excursions, some way to make good use of their airplanes and their expertise—like helping families in need. Thus began Angel Flight West.


The fledgling organization—initially known as the American Medical Support Flight Team—flew 15 missions that first year. Today Wood is board chair of an organization that oversees a network of more than 1,400 pilots across 13 western states. These pilots donate their aircraft, piloting skills and all flying costs to help families receive vital treatment that might otherwise be inaccessible because of financial, medical or geographic limitations. Last year, AFW flew 4,113 missions: flying passengers to specialty medical centers; transporting blood to critically ill patients; flying special-needs kids to summer camps; and many more humani­tarian missions. The effort involves more than 2,500 volunteers—not only the pilots, but people who work with hospitals and treatment centers, and who coordinate flights, provide ground transportation and assist pilots on missions—they’re called “Earth Angels.”


Among AFW’s largest supporting partners is Alaska Airlines, which handles most of the Alaska in-state transportation needs, as well as flights for AFW recipients who need to travel to the Lower 48. Alaska donates $500,000 each year in travel credit to AFW. In-kind contributions have totaled more than $8 million since the relationship began in 2003, and AFW is the airline’s single-largest corporate gift recipient.


“Alaska’s values of being caring and kindhearted really come to life when our airplanes and talented professionals are put into service in support of those who need a helping hand,” says Joe Sprague, senior vice president of external relations at Alaska, and a former AFW board member. “Our founders in Alaska used to do mercy flights to remote villages. Alaska’s involvement with Angel Flight West keeps that tradition alive in the 21st century.”


The process starts when a patient in need reaches out to AFW at angelflightwest.org. Once a request is validated, the mission is posted to the pilot base through emails, texts and AFW’s online portal. Pilots accept the routes they’d like to fly and then coordinate the logistics. There is never a charge for passengers. Pilots can fly as many missions as they want: AFW recently honored Seattle area pilot Bob Schaper for his 1,000th mission.


And there is no shortage of pilots. Wood notes a recent listing for a boy who needed to fly from San Juan Island in Washington to Seattle several times a week following brain surgery. Every flight leg was filled the first day of the posting.


By Paul Frichtl, Alaska Beyond