Market News October 31, 2016

Southern California Real Estate Market Update


ECONOMIC OVERVIEW

Over the past 12 months (through August 2016), the markets covered by this report added 273,200 new jobs and the total number of people claiming unemployment insurance dropped by over 100,000. With these shifts toward full employment, the area’s unemployment rate dropped from 6.2% to 5.1% during the past year. Some might note that unemployment was only 4.3% in second quarter and wonder why the rate has increased; however, the reason for this is that there was a substantial increase in the civilian labor force which rose by over 200,000 people.


HOME SALES ACTIVITY

  • There were a total of 52,550 home sales in third quarter of 2016. This was 0.6% lower than the same period in 2015, and 3.1% lower than seen in the second quarter of this year.
  • The drop in sales is likely a result of inventory levels which remain well below historic averages. It’s worth noting that, while the number of listings in the third quarter was 4.2% lower than the same quarter a year ago, it increased by 5.9% relative to the second quarter of this year.
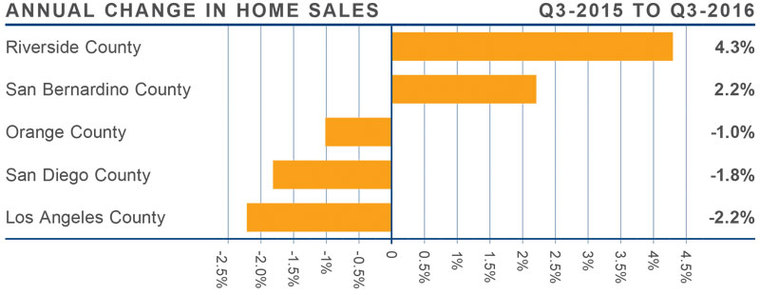
  • Home sales continue to be a mixed bag with transactions higher in Riverside and San Bernardino Counties, but lower in L.A., Orange, and San Diego Counties.
  • Even with the recent increase in listings, we are still well below where we need to be for the market to be considered balanced.


HOME PRICES

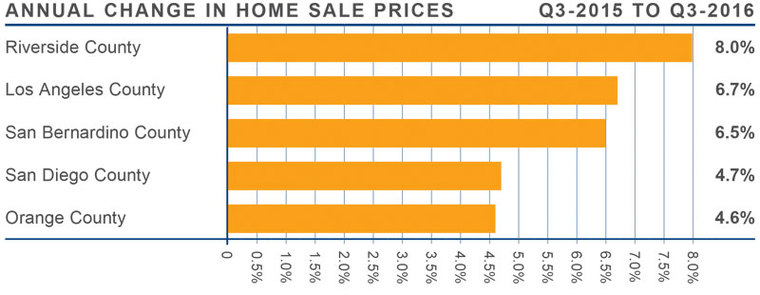
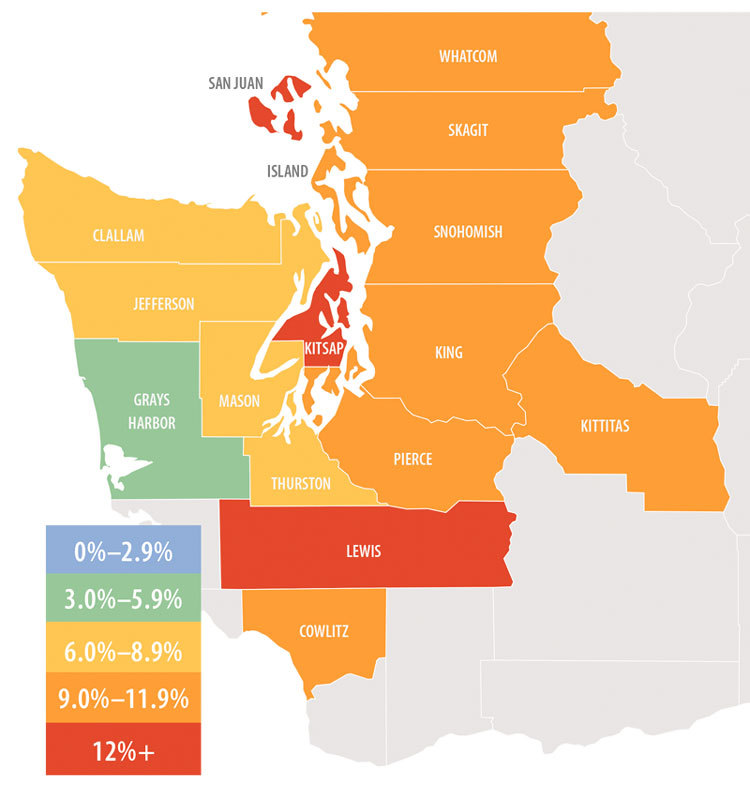
  • When compared to third quarter of 2015, average prices in the region rose by 5.8% and are a modest 0.1% higher than seen in the second quarter of 2016.
  • When compared to second quarter, San Diego, Riverside, and Los Angeles Counties all saw average home prices decline. While they are all up year-over-year, we may be seeing a small shift in the market in which price growth is expected to slow.
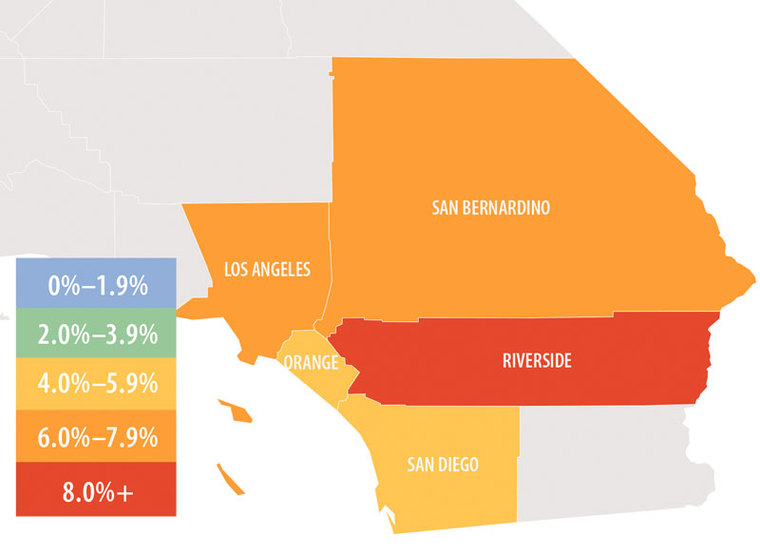
  • Riverside County saw the greatest appreciation in home values (+8.0%). This was followed by Los Angeles County, where the average price rose 6.7%.
  • Pending sales were up across the board, and it will be interesting to see what effect this jump may have on home prices in the fourth quarter.


DAYS ON MARKET

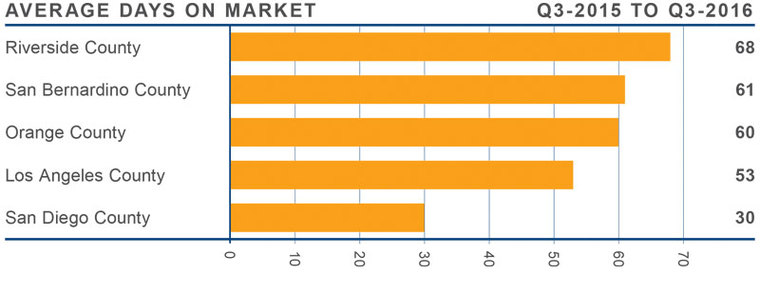
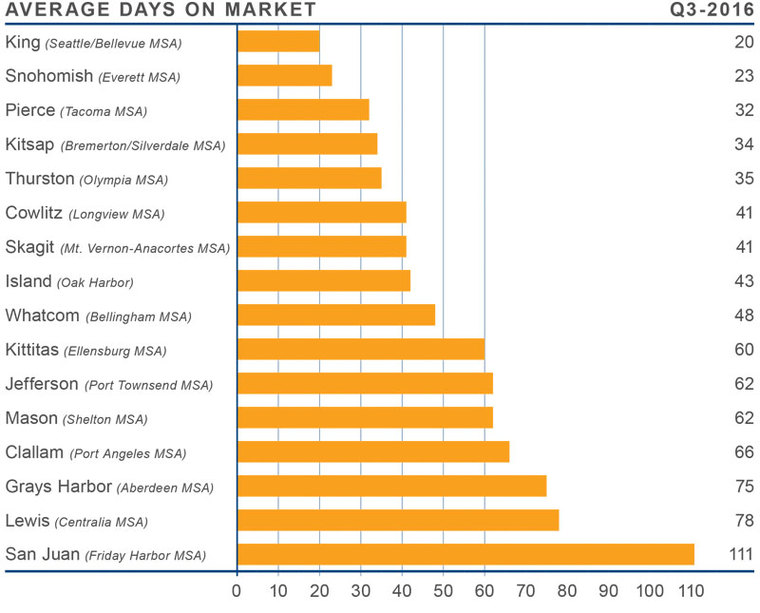
  • The average time it took to sell a home in the region was 55 days. This is a drop of 3 days when compared to the third quarter of 2015.
  • The drop in days on market is starting to slow. With the jump in new listings that I described earlier, we may see days on market start to rise as we enter the winter months.
  • Homes in San Diego County continue to sell at a faster rate than the other markets in the region. In the third quarter, it took an average of 30 days to sell a home there, which is four days less than seen a year ago.
  • All five counties saw a drop in the amount of time it took to sell a home between the third quarter of 2015 and the third quarter of 2016.


CONCLUSIONS

The speedometer reflects the state of the region’s housing market using housing inventory, price gains, sales velocities, interest rates and larger economics factors. The regional economy continues to add jobs and this continues to increase the demand for housing.

That said, price points in some markets are approaching pre-bubble levels and, without sufficient income growth, housing affordability will become an issue. I remain hopeful that additional housing inventory will address this pent-up demand, causing prices to appreciate at more modest rates.

I’ve left the speedometer unchanged from last quarter. Intuitively, I think the market may be headed back to being more balanced, but I want to see a few more quarters of moderating home prices and greater choice for buyers before I make that call.


Matthew Gardner is the Chief Economist for Windermere Real Estate, specializing in residential market analysis, commercial/industrial market analysis, financial analysis, and land use and regional economics. He is the former Principal of Gardner Economics, and has over 25 years of professional experience both in the U.S. and U.K.


Living October 31, 2016

Friend or Foe? How to Identify, Trap and Rid your Home of Ghosts

How do you know when you have a ghost hanging out in your home? Signs include unexplained noises and voices, objects disappearing, electronics turning on and off by themselves, lights flickering, unexplained smells, or an uneasy feeling that you’re being watched. But how do you know for sure that it’s paranormal activity – and not the cat – causing these abnormalities? And how do you rid your home of them? Here are some tips.

What is paranormal activity?

If you are experiencing something abnormal that defies logic, you may be dealing with paranormal phenomena. But first you want to rule out anything that is easily explained. So ask yourself, is there a rational explanation for the spooky activity? Could it be the wind, someone playing a prank, or maybe the cat? If it’s none of these things, and you are sure you are dealing with the paranormal, proceed with caution.

Identifying your spirit

Sometimes ghosts don’t realize they’re dead or being bothersome; they just want to remain in their home. But if they become territorial they can do downright scary things. How is your ghost presenting itself? Are you hearing bumps, whispers or screams? Are items levitating, or crashing around? It’s important to understand the motivation of your ghost; this will help you decide if you can work out an arrangement, or if you need to exorcise them from your home.

You may also want to explore if this ghost is familiar to you, a loved one or sworn enemy, or if you are encountering a spirit that is unknown to you. If you have recently moved into a new home with a sordid past, you will want to look up the home’s history to give you insights into what you’re dealing with. The next step is to decide whether or not you are willing to share your home with your ghost. Assess how you feel; you should always listen to your gut. If you are scared, literally to death, then you will definitely want to proceed to the next step.

Ghost busting

If you ain’t afraid of no ghosts, you can attempt to trap the spirit yourself, but you’ll need to invest in some specialized equipment to do so:

  • Use a manual (film camera), camcorder and/or tape recorder to identify the ghost (and prove to your friends that you aren’t crazy)
  • EMF (Electromagnetic field) detector to track the ghosts presence in real-time
  • Infrared thermal scanner to detect cold spots caused by ghosts
  • Apps for your smart phone have come a long way and are definitely worth a try

Once you’ve tracked your ghosts, it’s time to get rid of them.

Ask politely:

It sounds silly, but some ghosts mean no harm, especially if they are a family member. You can always nicely ask an unwanted visitor to leave. Or let them haunt a part of your home that you don’t use often, like the attic or the guest room when your mother-in-law sleeps.

Burial Method:

Acquire a metal box and fill the bottom with soil from hallowed ground (from a church or cemetery) and lure your ghost to the box with some chocolate or a lotto ticket. Once he’s inside, secure the box closed, sprinkle with salt and bury.

Candle Method:

Find a glass jar with a secure lid. At midnight, light a candle within the jar at the haunted location. The ghost will be attracted to the candle, and once he or she is inside the jar (which you’ll know because you’ve used your fancy equipment to track it), close and seal it for eternity.

Hire a professional:

Many paranormal seekers are actually volunteers, so you can contact a local organization in your area for advice and help: http://www.paranormalsocieties.com/usa-paranormal-groups.cfm

Move:

You win some, you lose some.


Happy Halloween!


Market News October 27, 2016

Western Washington Real Estate Market Update


ECONOMIC OVERVIEW

Annual employment growth in Washington State slowed somewhat in the third quarter of this year, but still remains well above the long-term average. Additionally, the jobs that are being created are primarily quality, high-paying positions, which is important for the health of our economy.

Unemployment in the state remains at levels that are somewhat higher than I would like to see, but this continues to be impacted by a growing labor force and modestly slowing job growth. I still expect to see the rate drop a little further as we move through the final quarter of the year.


HOME SALES ACTIVITY

  • There were 24,277 home sales during the third quarter of 2016—up by an impressive 7.9% from the same period in 2015, and 6.8% above the total number of sales seen in the second quarter of this year.
  • Skagit County saw sales grow at the fastest rate over the past 12 months, with transactions up by 25.6%. There were also impressive increases in home sales in Thurston, San Juan, Pierce, and Grays Harbor Counties. Sales fell slightly in Jefferson and Kittitas Counties.
  • Overall listing activity remains low with the total number of homes for sale at the end of the quarter 11.2% below that seen a year ago. That said, I’m happy to report that listings have been slowly trending higher in 2016.
  • I’ve been thinking about how sales can continue to rise while inventory remains so low. I believe this is due to an uptick in first-time buyers. These buyers have no home to sell, so they don’t add to the number of listings; however, they do cause sales to increase when they buy. This is a good trend to see!


HOME PRICES

  • As demand continues to exceed supply, we are continuing to see upward pressure on home prices. In the third quarter, average prices rose by a substantial 10.2% and are 3.2% higher than seen in the second quarter of this year.
  • The current rate at which homes are appreciating cannot continue, and I anticipate that we will see a “cooling” start to take place in 2017.
  • When compared to the third quarter of 2015, price growth was most pronounced in Lewis County. In total, there were nine counties where annual price growth exceeded 10% and prices were higher across the entire region when compared to a year ago.
  • Although supply levels are slowly starting to creep higher, we are still solidly in a seller’s market. Rising inventory levels should start to do a better job of meeting demand next year, which when combined with modestly higher mortgage interest rates, will see the region move closer toward becoming a balanced market.


DAYS ON MARKET

  • The average number of days it took to sell a home dropped by twenty-two days when compared to the third quarter of 2015.
  • All the counties that comprise this report saw the length of time it took to sell a home drop.
  • In the third quarter of 2016, it took an average of 52 days to sell a home. This is down from the 74 days it took in the third quarter of 2015, and down from the 67 days it took in the second quarter of this year.
  • King and Snohomish Counties remain the only two markets where it took less than a month to sell a home. Even though King County saw days on market rise slightly from 18 to 20, it remains the hottest market in the region.

CONCLUSIONS

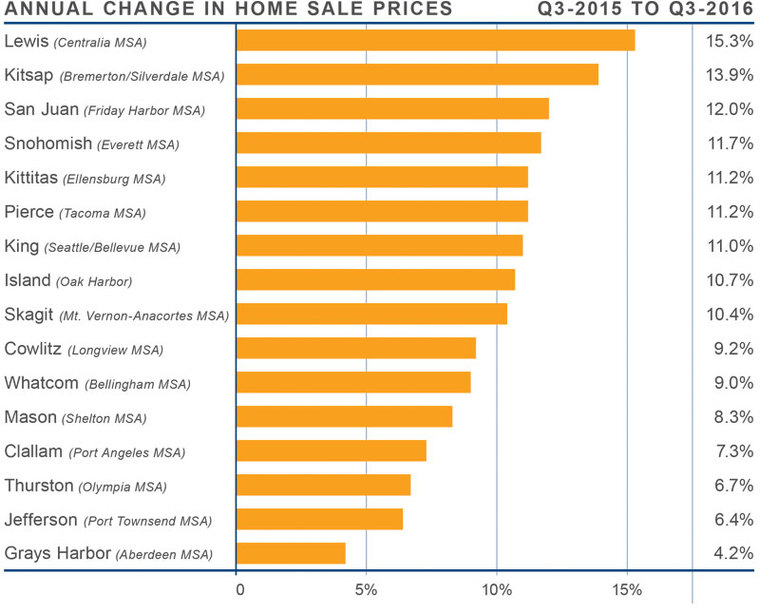
This speedometer reflects the state of the region’s housing market using housing inventory, price gains, sales velocities, interest rates, and larger economics factors. For the third quarter of 2016, I am moving the needle very slightly toward the buyers. This is entirely due to the recent increase in inventory levels that I believe will continue through the rest of the year. That said, the region remains steadfastly a seller’s market.


Matthew Gardner is the Chief Economist for Windermere Real Estate, specializing in residential market analysis, commercial/industrial market analysis, financial analysis, and land use and regional economics. He is the former Principal of Gardner Economics, and has over 25 years of professional experience both in the U.S. and U.K. 

More October 26, 2016

4 Simple Steps to Painting a Wall Faster

Many books about painting will tell you to paint a small strip along the baseboards, doorways, trim and other edges of the room with a brush before breaking out the paint roller to paint the rest of the wall. But before you do this paintbrush work, called “cutting in,” consider paint expert Shauna Gallagher’s method: Roll paint on the wall and then use a paintbrush for the edge work. To learn more about this technique, watch as she paints the feature wall of a room.


Paint Faster 1: Houzz TV, original photo on Houzz


Watch a video tutorial here


Step 1: Add Paint to the Roller

With a paint roller in hand, Gallagher dips her roller cover into the paint and then rolls it down the cage in the bucket to remove excess paint. She recommends rolling down and not up to avoid splattering paint out of the bucket. If you have excess paint on the edge of the roller, use a chip brush to wipe it off so it doesn’t drip on the wall.


Paint Faster 2: Houzz TV, original photo on Houzz


Step 2: Roll on the Paint

In rolling the paint on the wall, Gallagher uses vertical movements — rolling up and down as she moves across the wall — so she can glide right up against the taped-off edges. The paper-and-tape combo, which she applied to the wall’s edges with a tape gun, gives her extra protection against getting paint on the ceiling and adjacent walls.

Because she is painting a smooth wall with a thin roller cover, she can get closer than if she were painting a textured wall with a fluffy roller. Additionally, she rolls horizontally along the ceiling line to get even closer with the roller. She says she can roll paint within about 1 inch of her taped-off edges. If she would have cut in first, she says she might have painted a strip of 5 to 6 inches with a paintbrush.

“You are looking at a huge time savings if you roll paint first,” she says. “It might be 1½ hours versus 25 minutes.”

As she rolls, she keeps the arm of the roller on the side of the direction she is traveling across the wall. She is going from left to right, so the arm is on her right side. She uses this method because a small line of paint forms on the edge, and she can pick up that extra paint and spread it out as she goes.

Keep a Hamper Nearby for Messy Rags

After she completes a section, Gallagher lightly goes over the wall again, this time rolling only downward, to remove any roller lines and give the paint an even finish.


Paint Faster 3: Houzz TV, original photo on Houzz


Step 3: Paint the Edges

Once you have rolled paint on as much of the wall as possible, fill in the unpainted areas with a paintbrush. Because she rolled paint close to the wall’s edges, Gallagher can make quicker work of the cutting-in step of her project.

For this step, she dips her paintbrush into the paint and then removes paint from one side of the brush by wiping it along the edge of the can. She uses this side of the brush as she paints along the taped edge. Applying less paint to the taped edge keeps the taped line crisper, she says, and prevents paint from squishing up into the corner.


Paint Faster 4: Houzz TV, original photo on Houzz


Step 4: Remove the Tape

After painting, Gallagher waits until the paint is just dry before methodically removing the tape. She recommends putting your hands close to the wall and pulling the tape at a 45-degree angle.

“When you are farther away, you are yanking on the tape a little more,” she says. Her technique helps keep paint from pulling away from the wall.

When you are done, you can step back and admire a wall that you painted in a fraction of time, thanks to the reverse method.


Next Up: How to Paint Kitchen Cabinets Like a Pro


By Brenna Malmberg, Houzz 

Living October 10, 2016

Childproofing: Protect Your Family and Your Home from Potential Hazards

When you think of your home, it likely conjures up feelings of safety, shelter, and comfort. However, accidental injuries in the home are one of the leading causes of harm to children 14 and younger. By taking certain precautions, many of these accidents can be prevented.

While supervision is the best way to keep your children safe at home, you can’t watch them every second. Childproofing, to whatever degree you are comfortable, will go a long way toward keeping your littlest loved ones safe and healthy at home.

Here are some tips to get you started.

Many accidents happen with or around water.

If you have children at home, it’s advisable to adjust your water heater to no higher than 120 degrees to prevent scalding. Furthermore, you should never leave a small child unattended in a bath tub, even for a few seconds. And be sure to safely secure doors that lead to swimming pools and hot tubs, including pet doors. When cooking or boiling water, turn pot handles in, or better yet use the back burners, to prevent little hands from pulling them off the stove.

Household chemicals can be very harmful to children.

It’s important not to keep poisonous materials under the sink, even if you have a cabinet guard in place. Keep dangerous chemicals up high and in a room that isn’t accessible to your little ones. Seemingly innocuous medicines can also be dangerous. Make sure your medicine cabinet is out of sight, mind, and reach.

Use safety latches and gates.

It’s advisable that you use safety latches on drawers, cabinets, toilets, and windows, as well as place covers on all electrical outlets. Gate off stairways and entrances to rooms, such as garages, that contain dangerous or fragile objects.

Secure furniture and other objects.

Heavy furniture, electronics, and lamps must be secured to prevent a child from pulling them over. Bookshelves and entertainment centers often come with devices that attach them to walls so that a climbing child won’t topple the furniture. The end-caps on door stoppers can be a choking hazard, so it’s advisable to remove them. Place plastic bumpers on sharp corners or edges of coffee tables, entertainment centers, and other furniture to prevent cuts and bruises.

Install a carbon monoxide detector.

The U.S. Consumer Product Safety Commission (CPSC) recommends that consumers purchase and install carbon monoxide detectors in addition to smoke alarms. Be sure to test both devices regularly and replace batteries as needed. The American Red Cross advises families to learn first aid and CPR, and to devise an emergency evacuation plan for fires and earthquakes.

Emergency contact info.

Last, but not least, in case an emergency does happen, always keep numbers for your child’s doctor, your work and cell, and other emergency contact info in an easily found place, preferably near the phone.

Accidents can and will happen, but by following a few small steps you can have peace of mind knowing that you’ve done everything you can to protect your family from harm in your home.

More September 30, 2016

How to Reduce Noise in an Open-Plan Design

Open-plan living spaces have many advantages for family life and entertaining, and they increase the opportunity to bring lots of natural light into your home. But they can end up being quite noisy. You may be surprised, however, at how easy it is to reduce sound travel with a few key additions to your furnishings. There are also structural changes you can make if you’re after a more robust fix.


Related: 8 Architectural Tricks to Enhance an Open-Plan Space


1. Dress your windows.

Large areas of glass, such as big windows and glass doors, act as bouncing-off points for sound to travel in an open-plan room. Introducing curtains will help deaden the noise. A sheer fabric works especially well, as it won’t totally block the light or views.

For maximum muffling, curtains work better than blinds, simply because there’s so much more fabric involved.

Reduce Noise 1: Environ Communities Ltd, original photo on Houzz


2. Introduce rugs.

Another way to deaden sound is to cover hard floors with rugs. Here, the use of a rug in the living space both minimizes noise and helps define the seating area, making the room feel more intimate.

When it comes to rugs, the thicker the pile, the better the soundproofing, so a cut-pile rug will tend to work better than a flat-weave design.

Reduce Noise 2: HelsingHouse Fastighetsmaklare, original photo on Houzz


3. Break it up.  If you can, try to break up your open-plan space to create zones. This will also help contain the noise. Here, the fireplace in a freestanding wall maintains a visual connection with the space beyond while breaking up the room to create a more defined living area.

If you want to incorporate a feature like this, bear in mind that you’ll need to position the fireplace so you can create a flue, which will need to go through the ceiling or an external wall.

Reduce Noise 3: Stuart Sampley Architect, original photo on Houzz


4. Add a storage wall. The wood-paneled wall in the middle of this large room works beautifully to separate the kitchen from the living area. This kind of feature can be a freestanding structure or a custom piece of furniture, making it a relatively easy and cost-effective solution to break up the space, since you won’t require any structural elements.

Reduce Noise 4: DTDA pty ltd, original photo on Houzz


5. Fit a feature screen. If you can’t bring yourself to divide the space with something permanent, a nice alternative is to introduce a screen as a buffer between zones. It won’t be as effective as a solid structure, but it will help diffuse the noise slightly. The louvered screen seen here allows a glimpse of the living space beyond.


Reduce Noise 5: Studio Revolution, original photo on Houzz


6. Panel your walls. Large, flat, hard surfaces can amplify sound, so adding texture will help reduce this effect. Lining one of your walls with wood not only creates an interesting feature, it does the sound-dampening job. It’s as simple as using flooring material on the walls instead. For a more traditional look, painted wood paneling works equally well.

Often, walls aren’t completely flat, so you’ll first need to add wood battens to the surface onto which you’ll attach your paneling. A good flooring contractor or woodworker can do this, or if you’re pretty confident at DIY, you could tackle it yourself.

Reduce Noise 6: Honka UK Ltd, original photo on Houzz


7. Bring texture to your ceiling. Just like walls, a large expanse of ceiling will encourage the spread of sound, so try adding a textured surface there too. In this example, the ceiling and walls have been paneled with wood boards painted white.


8. Fashion fabric panels. If wood isn’t your style, consider covering one of your walls with some form of acoustic material. These padded fabric panels are highly effective at deadening sound. You can also buy off-the-shelf acoustic panel systems, which can be fixed to your walls and are easy to install.


9. Go soft underfoot. Hard floor surfaces, such as tile, are less than ideal when it comes to controlling noise, so consider something like linoleum instead, which is a durable and practical finish in a kitchen. It’s also soft underfoot, meaning it will absorb the clunk and clatter of cooking.


By Denise O’Connor, Houzz

Living September 27, 2016

Keeping Up with the Joneses: The Great Paint Debate

A few weeks back, Jenn and I decided to finally pull the trigger on painting our home. The vinyl siding of the 1942 Seattle Cape Cod fixer we purchased nine months ago had been sun bleached to the point of resembling a kind of soft lemon chiffon yellow you’d see on a cake your grandmother baked. Great for dessert, bad for today’s exterior home color.  We wanted a charming, warm and inviting new exterior home color but were fearful about what it would cost to have a professional do it. We had saved between 10-15k by renovating our bathroom ourselves.  Couldn’t we just pick up some paint and make a Saturday of it?


Pro tip: In Seattle, painting outside competes with the weather. Make sure you have a runway of at least a week of good weather to ensure you can paint the house in its entirety while leaving time for it to dry.

Seeing as the summer season was pretty much over (say it ain’t so!) and the wet Seattle fall was nearly upon us, we figured we had only a week or two left to get the job done. I’m the kind of person who jumps on a new project… and maybe sometimes I put the horse before the cart. *Cue Jenn’s pursed-lips smirk* So once Jenn and I agreed we were going through with the project, I had three different painters bid out the job and booked the least expensive (but experienced) professional within two days. I scheduled him to arrive the following day.


Good Husband Tip: Don’t give your wife 12 hours to decide what color to paint your house.


Pro TipDon’t feel bad about shopping for the best price with home professionals. They bid homes out every day and won’t be offended. Most of the time, they present a bid with room for negotiation. It never hurts to get a second bid or ask for a cheaper price.

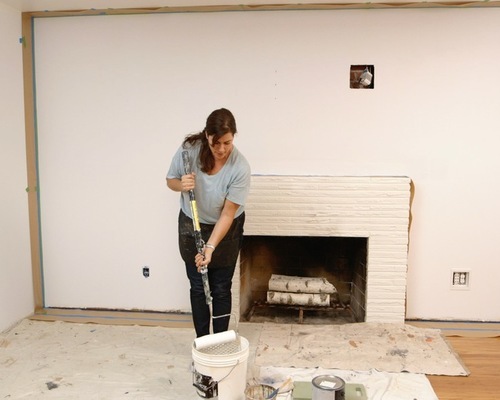
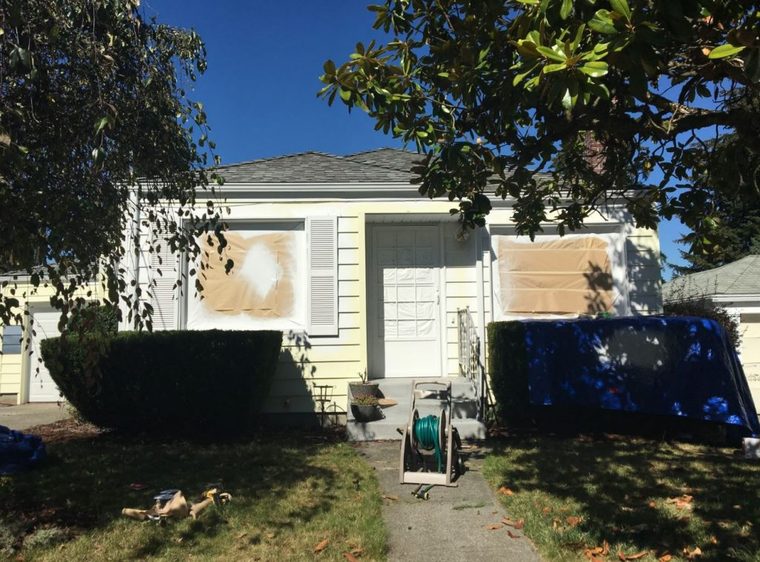
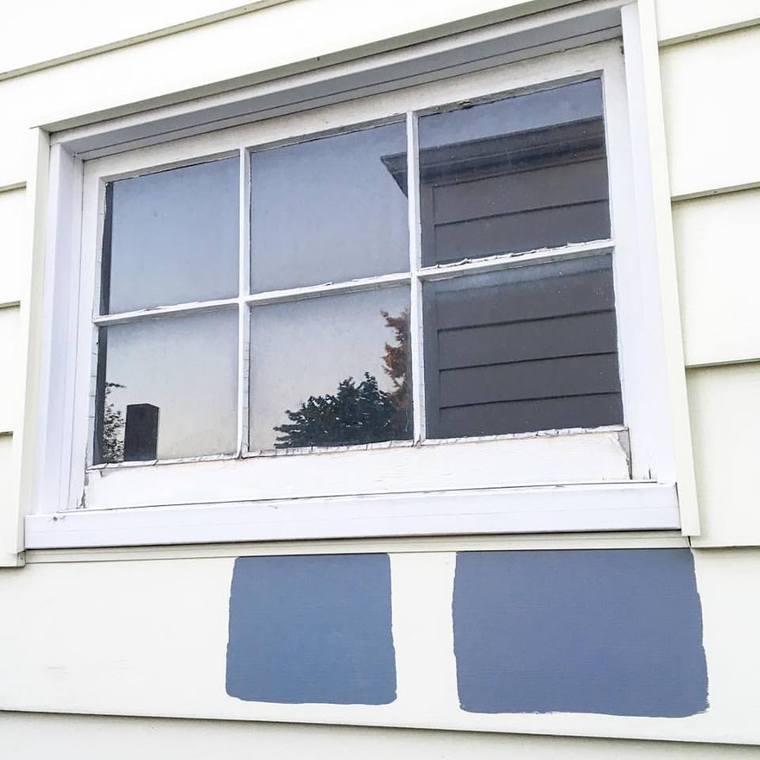
With the pressure of our painter showing up the next day, we scarfed down dinner and took a trip to the paint store.  (I tried to convince my wife this was an opportunity for us to bond as a family unit.  “We could make it educational! Teach Addie about hues and shades!  C’mon, honey… it’ll be fun!” *Cue Jenn’s pursed-lips smirk*) We knew we had to get special paint for our vinyl siding so that narrowed it down to about 20 options.  And we wanted a sort of dark blue so we picked out two colors that looked promising and headed home to test them out.

Pro TipWhen testing paint, make sure you let it dry before you decide which color to go with.  Paint a few different swatches on various sides of the house and watch how it looks during different times of the day.

One test swatch (on the right, called “Prime Time”) was a little purplely/blue grey and the other was a slightly lighter blue (on the left, called “Stone Cold).  Those are two seriously stellar wrestler names, amiright?


With our painter arriving that evening, the pressure was on for us to choose. We’re Millennials so we did the only logical thing you can do when making a big decision. We asked our friends on Facebook. 76 comments later, there was still no clear answer.

Mid-debate, our dear friend Kim Gorsline of Kimberlee Marie Interior Design called us up with some highly insightful information.  First of all, a paint store has pre-mixed vinyl siding paint but they can actually make ANY color into vinyl siding paint.  Which means we had a lot more choices (which left me feeling excited and gave Jenn heartburn).  More importantly, Kim pointed out that the two options we had might not be exactly what we hoped for.  She suggested a few colors that had more grey tones and in much deeper shades.  She promised us that we’d still get the blue house of our dreams even if the colors looked dark grey on the swatches.


Pro tip: You can get small paper swatches for free or pay a few bucks for a large paper square but nothing will compare to a sample of real paint on your surface.  We spent $59.34 on paint samples and it was worth every penny.

Back to the paint store we went, grabbing three more options to test.  Our painter began taping off the trim as we took a few steps back to assess the swatches… BOOM! We had our answer… Britannia Blue by Benjamin Moore. Not the best wrestler name but a nice blue nonetheless.

We trust Kim’s vision and design talent wholeheartedly and as the days went on and the paint went up, we couldn’t have been more pleased.  I installed some new lights fixtures and house numbers that Jenn picked out.  Only this time, I gave her three days of lead time *Cue Jenn’s pursed-lips smirk*


Tyler Davis Jones is a Windermere Real Estate agent in Seattle who, with his wife Jenn, recently traded in their in-city condo for a 1940s fixer-upper. Tyler and Jenn, along with the help of some very generous friends and family members, are taking on all the renovations themselves. You can follow the transformation process on the Windermere Blog or on Tyler’s website and Instagram
 

More September 26, 2016

Selling Your Home? Go Through This Safety Checklist With Your Real Estate Agent

Selling your home can be stressful for many reasons. Not only are you trying to get the best financial return on your investment, but you might also be working on a tight deadline. There’s also the pressure to keep your home clean and organized at all times for prospective buyers.  One thing you can be sure of when selling your home is that there will be strangers entering your space, so it’s important for you and your agent to take certain safety precautions.


  • Go through your medicine cabinets and remove all prescription medications.
  • Remove or lock up precious belongings and personal information. You will want to store your jewelry, family heirlooms, and personal/financial information in a secure location to keep them from getting displaced or stolen.
  • Remove family photos. We recommend removing your family photos during the staging process so potential buyers can see themselves living in the home. It’s also a good way to protect your privacy.  
  • Check your windows and doors for secure closings before and after showings. If someone is looking to get back into your home following a showing or an open house, they will look for weak locks or they might unlock a window or door.
  • Consider extra security measures such as an alarm system or other monitoring tools like cameras.
  • Don’t show your own home! If someone you don’t know walks up to your home asking for a showing, don’t let them in. You want to have an agent present to show your home at all times. Agents should have screening precautions to keep you and them safe from potential danger.

Talk to your agent about the following safety precautions: 

  • Do a walk-through with your agent to make sure you have identified everything that needs to be removed or secured, such as medications, belongings, and photos.
  • Go over your agent’s screening process:
    • Phone screening prior to showing the home
    • Process for identifying and qualifying buyers for showings
    • Their personal safety during showings and open houses
  • Lock boxes to secure your keys for showings should be up to date. Electronic lockboxes actually track who has had access to your home.
  • Work with your agent on an open house checklist:
    • Do they collect contact information of everyone entering the home?
    • Do they work with a partner to ensure their personal safety?
  • Go through your home’s entrances and exits and share important household information so your agent can advise how to secure your property while it’s on the market.

Your safety, as well as that of your agent and your home, is of paramount importance when selling a property. For more information, visit:

http://www.mercurynews.com/los-gatos/ci_26509084/realtors-issue-safety-tips-folks-who-are-selling

http://realtormag.realtor.org/sales-and-marketing/feature/article/2014/09/safety-talk-you-need-have-clients

More September 23, 2016

#YourStoryIsOurStory: Kicking off the School Year Right


Starting the school year can be nerve wracking; new friends, new classroom, and for some, a new school all together. Imagine starting the new year already behind, with shoes that don’t fit, clothes that are stained or too small, and inadequate school supplies. Many Windermere offices work very hard at the start of the school year to ensure this doesn’t happen for kids in our communities, and our office in Mercer Island, WA took the challenge to a new level by ensuring that more than 300 homeless youth were ready to kick off the school year right.


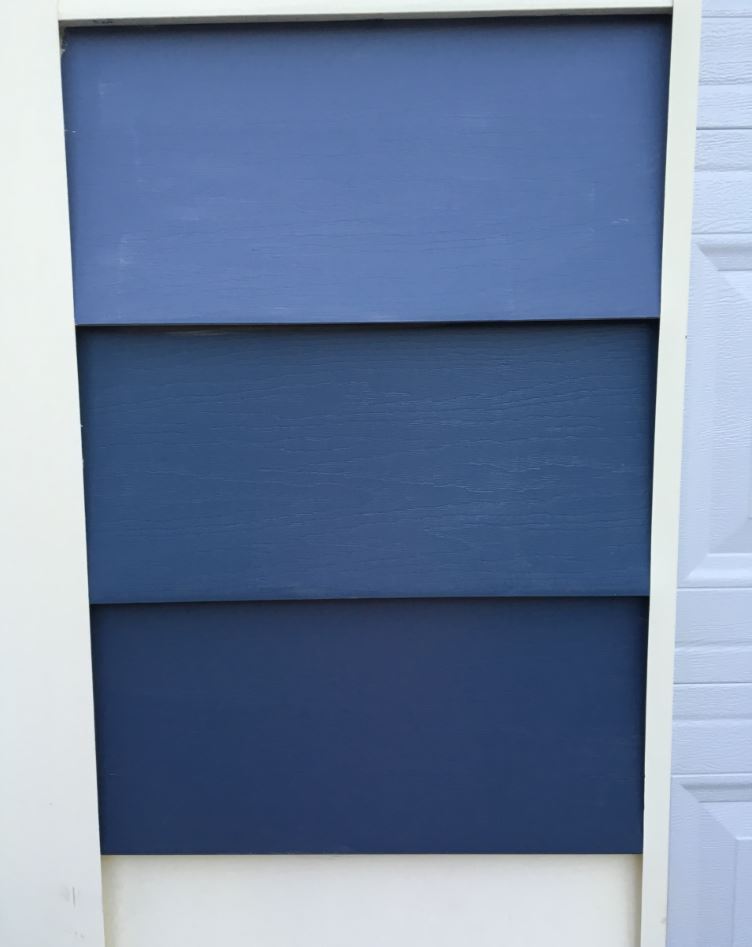
For the last three years, Windermere Mercer Island has partnered with Mary’s Place for their annual #KicksforKids back-to-school drive. Mary’s Place provides emergency and transitional housing for homeless families in the greater Seattle area. While most homeless shelters cater to adults, Mary’s Place helps ensure families can stay together, providing the support and stability kids really need while waiting for permanent housing solutions.

Three years ago, Windermere partnered with Mary’s Place, calling on multiple area offices to help provide shoes, and our Mercer Island office really took this shoe-raiser to heart. Each year their office has upped the ante, gathering more shoes, and supporting more kids! This year, new shoes were donated by agents, staff, clients, and the Mercer Island community, with the office matching donations, collecting a grand total of 432 pairs for kids of all ages and sizes.


On Wednesday, August 31, 11 Windermere agents and staff spent the day at Mary’s Place North Seattle Emergency Shelter, delivering and organizing shoes, and acting as personal shoppers for more than 300 kids. After a giant pizza party, a personal shopper helped each child find a new pair of fitting shoes. From pre-school to high school, the joy of a new pair a of kicks was palatable, reminding us all that something as small as a pair of shoes can make a big difference for a kid’s confidence at the start of the school year.

Thank you to Mary’s Place for all the incredible work you do within our community to help families who need shelter, services, and hope. And thank you to the Windermere Real Estate Mercer Island office for taking the #Kicks4Kids drive to a whole new level. Together we can make a difference!


Living September 22, 2016

First Day of Autumn

Even though it happens year after year, the arrival of autumn is always a little surprising. Almost as if on a switch, one day late in the summer you feel it – a subtle crispness in the air. And before you know it, it’s pumpkin-spice-everything everywhere. We are suddenly swathed in sweaters, wearing boots, and bombarded by shades of orange, often even before the thermometer warrants it. After slogging through a long hot August, it can feel exciting.

Making the transition to autumn is also a great way to reorganize after a hectic summer and be better prepared going into the winter months. To make the transition a little smoother, we have created a to-do-list of ideas to help.

image of a gray colored bedroom
Start with your bedroom

Gauzy cotton feels decidedly summer, while soft cashmere has a distinctly autumnal vibe. This time of year, feel free to use both luxe textures at once, but incorporate them in colors that are appropriate for the changing seasons: cream for cashmere, gray or stone for linen.

image of flowers in a vase
Pay attention to plants

As the season changes, so should your indoor greenery. Switch out those palm fronds or orchids for eucalyptus branches or hydrangeas in deep purple hues.

image of a car buried in the snow
Winterize your car

Due for an inspection? Been meaning to get those tires changed? It’s tedious, but dealing with maintenance issues now instead of three months from now (when you’re stuck in a freak snowstorm) is definitely a smart move.

image of shelves packed with containers of dry goods
Perform a pantry audit

First, remove all the cans and boxes from the shelves and vacuum any lingering dust or crumbs. Then inspect each item before putting it back in its place, tossing anything that is expired or past its prime. If you are overloaded with canned goods, make a bag for the local food bank.

image of an empty calendar
Sync your family calendars

Now that you’re not in the land of weeklong vacations, keeping track of everyone’s schedule can be tricky. Go old-school by using a chalkboard calendar and placing it in a high-traffic area, like your mudroom. Or go high-tech and download the app Cozi. This tool combines everyone’s calendar and even lets you set up a shared grocery list (so you’ll never forget to pick up milk from the store).

imge of a living room with a fireplace
Don’t neglect the Fireplace

You may not be ready to think about it yet, but on the first chilly night you’ll be glad you did. Hire a professional to inspect the fireplace and chimney to make sure it’s clear and ready for use.