
 Facebook
 X
X
 Pinterest
 Copy Link
Bedding Basics: How to Fold a Fitted Sheet (and Other Handy Tips)

There’s something about slipping into a freshly made bed that just feels right. Crisp sheets, fluffed pillows, and a neatly folded duvet can turn even the simplest bedroom into a relaxing retreat. But before you get to the cozy part, it helps to know a few behind-the-scenes tricks, starting with how to properly fold a fitted sheet.
Whether you’re staging your home for buyers, organizing the linen closet, setting up a guest room, or want to bring more intention into your everyday routine, these tips can help you fold, layer, and care for your bedding like a pro.
The Secret to Folding a Fitted Sheet
Fitted sheets are notoriously frustrating to fold. But with a few simple steps, you can turn that tangled ball of fabric into a smooth, crisp square that stacks neatly in your linen closet.
1. Find the Corners
Hold the sheet lengthwise with the shorter sides hanging down and the longer sides running horizontally across your body. Place one hand inside each of the top two corners and flip the corners inside out. Turn the sheet to make sure the seams are facing you and the elastic is facing away.
2. Tuck the Top Corners
Take the corner in your right hand and fold it over the corner in your left hand, so the two corners are neatly tucked into each other, creating a pocket. Switch hands so that the pocket is now in your right hand.
3. Repeat with the Bottom Corners
With your right hand still inside the pocket you just made, reach down along the elastic with your left hand and locate the other pocket created by the bottom two corners. Holding both pockets in front of you, clap your hands together, tucking one pocket into the other. All four corners should now be tucked into each other, forming a rounded square shape.
4. Flatten and Shape
Place the sheet on a flat surface and square it off, smoothing and tucking any loose edges as you go. The elastic should form a “J” shape.
5. Fold It Up
From the bottom of the “J”, fold the sheet into thirds. Then fold the long rectangle into thirds again. The result should be a compact, tidy square that stacks easily in your linen closet.
How To Fold A Fitted Sheet Easily – Video By Sleepopolis
More Tips to Keep Your Bedding Looking (and Feeling) Its Best
- Rotate your sheets weekly to help them wear evenly and last longer.
- Make putting on a duvet cover easier with the roll-up method (a.k.a. the “burrito” trick)
- If you share a bed with a partner, try the Scandinavian sleep method by using two separate duvets for better sleep and fewer blanket battles.
- Add pillow protectors under your pillowcases to help extend the life of your pillows and keep them clean.
- A light linen or pillow spray can refresh your bedding between washes and create a calming bedtime ritual.
- Store sheets inside a matching pillowcase to keep your linen closet neat, organized, and easy to navigate.
- Size up your duvet insert for a fuller look and a cloud-like feel. You can also double up on duvet inserts for added warmth and a stylish look.
- Layer with intention by using extra pillows and textured throws.
- Ironing your pillowcases takes just a minute and makes your bed look freshly washed and made.
- If your sheets tend to slip off the corners, try sheet holders, or you can even repurpose a few chip clips in a pinch.
Looking for more ways to elevate your space and simplify your daily routines? Visit the Living section of our blog.
Preparing Your Garage for an Electric Vehicle

Electric cars help lower emissions and fuel costs, improve fuel economy, and bolster energy security. And considering the volatility of gas prices—and their general skyward trajectory—electric fuel shows promise as an economic alternative.
But switching to an electric vehicle entails more than new driving habits and a conversation piece with strangers. It’s also a lifestyle update.
5 Ways to Save and Reuse Water at Home
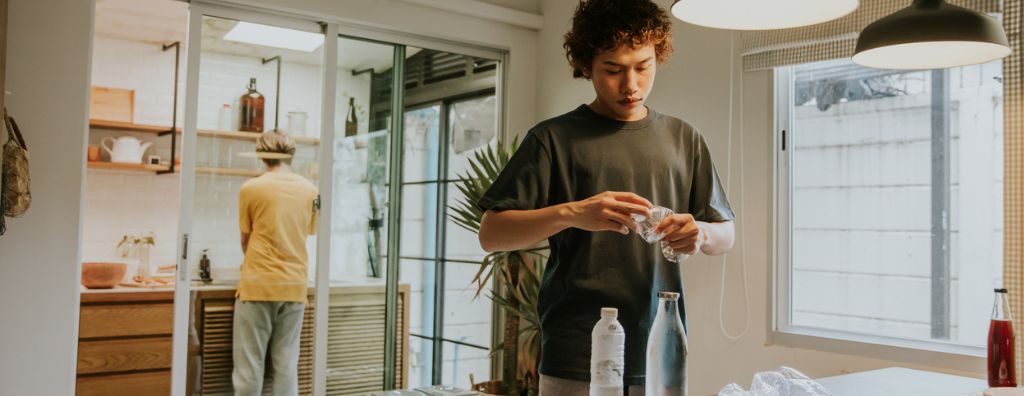
Think of all the ways you use water at home. Whether it’s meal preparation, laundry, or doing the dishes, we use a lot of H2O. In fact, the average U.S. household uses more than 300 gallons of water per day, with a majority of the water usage coming from three primary sources: the toilet, the shower, and the faucet. But there’s good news! Adopting more sustainable practices at home can cut down on wasted water and can save you money on your utility bills. Let’s take a look at some simple ways to use water more efficiently at home.
5 Ways to Save and Reuse Water at Home
1. Reuse Drinking Water
Dumping half a water bottle down the sink may not seem like a significant waste, but over time, discarding extra drinking water adds up. Use water from bottles and glasses to water plants or rinse a plate with it and give the kitchen faucet a rest. Water purifiers can help cut down on the amount of bottled water you purchase and ensure that you have a healthy water source available at all times.
2. Water Plants with Leftover Water
It takes a lot of water to get your pasta just right, or to wash your fruits and vegetables enough so they taste as fresh as possible. Can all this water go somewhere? Fortunately, yes! Reuse that pot full of pasta water to quench your plants in the garden. Collect the water used to wash your produce and shower your house plants with it. Instead of just pouring excess water down the drain and letting it go to waste, little methods like these give it a purpose.
3. Use Barrels to Collect Rainwater
Check local regulations before setting up a rain barrel to collect runoff from your gutters. But once you have the green light, you’ll be surprised at how quickly your rain barrels will fill up, especially if you live in a rainy climate. Remember that water can get very heavy very quickly. It’s important to support your rain barrel with a solid foundation, using patio pavers, plywood, or cinder blocks to prop it up and make it easy to access the spout. And don’t forget to empty it before the freezing temperatures arrive.
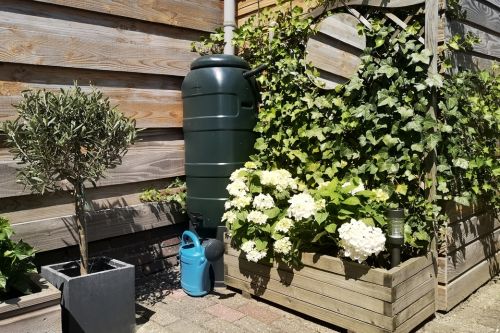
Image Source: Getty Images – Image Credit: Patrick Herzberg
4. Energy Star Appliances
Appliances are the true workhorses in a home, making our lives easier with how efficiently they tackle some of the most common household chores. However, some appliances are more efficient than others. Energy Star products are more efficient than other home appliances and are also held to a higher standard of efficiency by the U.S. Environmental Protection Agency (EPA). Next time you’re shopping for home appliances, look for the Energy Star badge on certified devices. These special products will help you save water with every cycle.
5. Garden Irrigation
Water is the lifeblood of a healthy, thriving garden, but there are ways to use water more efficiently in your garden beds. It starts with the plants you choose for your garden. Plants that are naturally acclimated to your local climate with thrive more easily. Group plants together based on the amount of water they need, so you don’t waste water running from one end of your garden and back with the hose running. Healthy soil is key to proper plant hydration, so it’s worth your energy as a gardener to focus on making your soil as rich and fertile as possible.
For more information on sustainable practices, cleaning tips and more, visit the Living section of our blog:
Featured Image Source: Getty Images – Image Credit: Erdark
Wildfire Preparation and Evacuation Tips

The following tips are meant to inform your household’s wildfire evacuation protocol, whatever your evacuation timeline may be.
5 Tips to Organize Your Closet
An untidy closet can clutter your mind. Organize your closet section by section and you’ll improve your morning routine, get rid of extra belongings, and clean up your home in the process. Before you begin your closet purge, it helps to visualize how you want it to look. Your closet’s size and dimensions will determine much of what you’re able to accomplish, but the goal is to get it nice and neat regardless of size. Here are a few tips to help you get started.
5 Tips to Organize Your Closet
1. Start From Scratch
Before you can build up the closet you’ve wanted, you have to empty out the old one. Start by clearing your closet of all your belongings and placing them in nearby storage. Take out all your hangers and any clothing bins that aren’t fixed in place. This allows you to take a step back and build from the ground up. It’s also an opportunity to clean the corners and hard-to-reach areas that don’t normally make it into your cleaning routine.
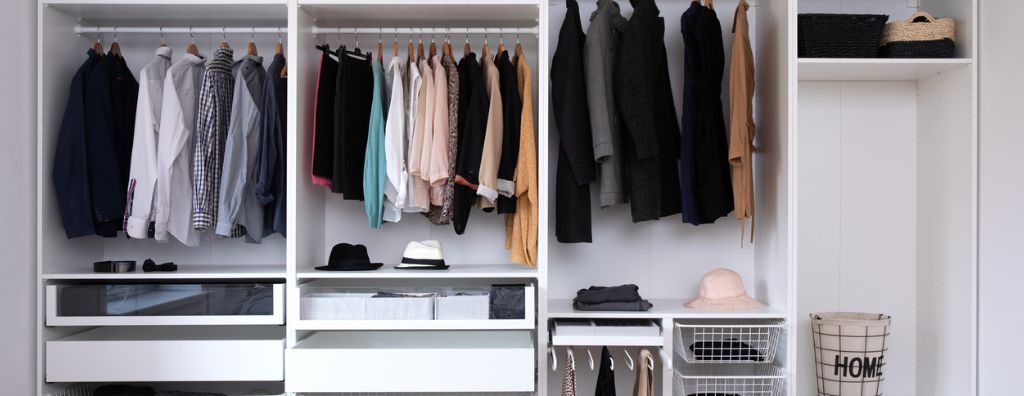
2. Add Shelves
Take measurements while your closet is empty to see what shelving can fit. When shopping for shelves, consider your wardrobe inventory. Do you have more pairs of shoes than pants? Which items take up more space than others? This will help you decide on the perfect set of shelves to address your needs. Keep in mind that the most commonly used items should go toward the front of your closet for easy access. Seasonal items like raincoats, snow gear, and bathing suits that you don’t use as often can go toward the back. Design your shelves to address these needs.
3. Maximize Space
Maximizing your closet space comes down to two main factors: design and storage. You can have the best closet design in the world, but if it doesn’t allow room for storage, then your wardrobe will be overflowing before you know it. Shelves with multipurpose storage and vacuum bags are two space-saving products that can make a huge difference in available space. A clothing rack is a useful tool, not only because it allows you to hang clothing neatly along the rod, but some products also come with underneath storage that can free up even more space.
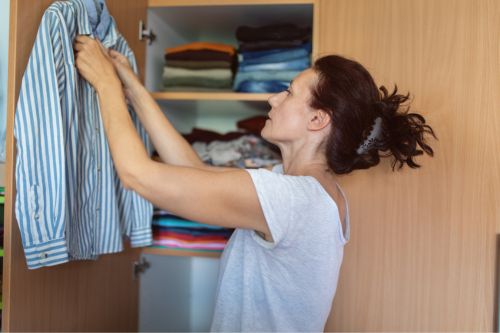
Image Source: Getty Images – Image Credit; miljko
4. Use Corners
Yes, your closet walls provide a nice home for shelving, clothing racks, hanging rods and the like. However, they’re not the only space where you can focus your organizing efforts. Instead of missing out on the negative space in the corners of your closet, use them to your advantage. Search for corner shelves that fit within your dimensions and fill them with items you would have had to place elsewhere. You’ll be surprised at how much space they can save.
5. Curate Your Closet
Now that you’ve taken steps to organize your closet, you’re ready to curate it. Iris Miyasaki (wardrobebysaki.com) is an expert in closet curation. As she puts it, closet curation is a stylistic approach to organization; it’s all about looking at your wardrobe through the lens of how those pieces get used in your life and arranging from there. “When you can see all your clothes, shoes, and accessories, you’ll want to use them more. I focus on creating a visual palette for my clients, whether that means organizing by color, silhouette, or types of items. The idea is to create a closet they’ll want to ‘shop’ in,” says Miyasaki. Once your closet is cleaned out, you’ll have freed up the mental space to look at your closet with curation in mind.
For more on all things home décor and homeowner tips, head to the Living section of our blog:
Featured Image Source: Getty Images – Image Credit: wip-studiolublin
Tips for Home Pest Control and Prevention

Any evidence of a pest infestation is a bad omen for homeowners. The last thing you want on your mind is the thought that critters could be crawling through your home, wreaking havoc as they go. Being proactive about home pest control can help you prevent an infiltration, and knowing what to do at the first signs of pest activity will help you limit the damage they cause.
Tips for Home Pest Control
Being a homeowner comes with the responsibility of protecting your property. Whether it’s a home security system to deter home burglaries, regularly cleaning to prevent mold growth, or testing for asbestos, you’ve got a lot on your plate. But these aren’t just nagging to-do-list items, they are important proactive steps that will help you avoid costly repairs. Preventing pests is no different; even the smallest bugs can do big damage. So, how do you stop them?
The best defense is a good offense, and keeping pests from getting inside will help reduce the damage they can cause. Though you may not be able to shut out every single bug, you can make it difficult for them. Cover holes with durable materials like steel wool and copper mesh to keep them out. Check all the seals and weatherstripping around your doors, windows, and on your roof, re-caulking as necessary to make them airtight, and patch up sections of torn window screens with new screen material. The gardener in you may enjoy the flourishing look of your plants, trees, and shrubs fully grown out, but if they’re touching your home’s siding or roof, it’s basically a highway express lane for pests headed indoors. Trim all landscaping away from your home to limit pest traffic and reduce your chances of them causing damage to your home.

Image Source: Getty Images – Image Credit: StepPro
DIY Pest Control
Extra garbage, leftover food, and plumbing leaks will attract pests. Regularly take out your trash and dispose of compostable food scraps to keep the bugs at bay. If a leak springs, it’s like a magnet for certain pests looking to capitalize on the damage. This emphasizes the importance of taking steps to prevent water damage in your home and quickly repairing leaks when they happen.
- If you plan to use pesticides in your home to deter ants, bugs, and other pests, do so safely. Visit the Environmental Protection Agency (EPA) online for tips on how to correctly use pesticides in your home.
You can also use common pantry items to deter pests. A mixture of water and an essential oil like peppermint, lemon grass, or cedarwood sprayed along windows and doorways is a natural way to repel bugs. A little apple cider vinegar with dish soap in a small cup will help you attract and catch fruit flies, whipping up a quick white vinegar-and-water mixture will quickly clean up messes pests leave behind, and the strong smell of coffee grounds is powerful enough to stop them in their tracks. Learn more about how these food products can help you get your home sparkling clean:
If pests have gotten in your home and started causing damage, it very well may be too late for DIY preventative measures like these. In these situations, it’s best to contact a local licensed professional to exterminate as needed. Depending on the extent of the damage, you may be temporarily displaced from your home. Be sure to plan ahead if that’s the case.
For more information on home maintenance, read the following blog post on preventing mold growth:
How to Prevent and Deal with Mold
Featured Image Source: Getty Images – Image Credit: AndreyPopov
How to Create a Balcony Garden

Gardens come in all shapes and sizes. For those who don’t have a flourishing backyard with acres of greenery, you’ve got to make do with the space you have to satisfy your inner green thumb. Creating a balcony garden can bring life to your terrace and give you some healthy options to add into your cooking. By plotting out the space, researching which plants will thrive on your balcony, and gathering the right materials, you’ll set yourself up for gardening success.
How to Create a Balcony Garden
First, consider your space. The amount of sunlight your balcony gets will determine what you’re able to grow and how quickly your garden will grow. Crops like tomatoes and strawberries need lots of sun to grow up healthy, while others like peas and herbs can still thrive in less sunlight. If your balcony is sunlight-deprived, you may need to invest in a grow light to give your plants the light they need.
What are your goals for your balcony garden? Are you looking to build out your collection of natural herbs or do you want to turn your terrace into your own personal exotic oasis? Whether your motives are culinary or aesthetic, planning out your garden will help you maximize space. Hanging and stack planters allow you to create a vertical garden, which helps save space. Climbing plants like honeysuckle, ivy, ferns, and different varieties of vines are perfectly suited for this kind of garden design. Before hanging any planting pots, hooks, trellises, shelves, or any kind of gardening equipment, check your governing Homeowners Association (HOA) policies to make sure your plans are within the rules.

Image Source: Getty Images – Image Credit: AleksandarNakic
Keep Your Plants Healthy
With any garden, your main concern is keeping your plants healthy. This means giving them plenty of water, treating your soil with care, and keeping up with seasonal demands depending on your local climate. If you’re looking to save money on your balcony gardening project, don’t focus your frugal efforts on soil. Soil is the lifeblood of your garden, so it’s important to give it a fresh, nutrient-rich mixture. Once you’ve selected your plants, research their needs to see which potting mix you need to pick up at your local gardening or hardware store. Depending on the chemical makeup of the potting soil, you may not need to fertilize your plants right away.
With a balcony garden, it’s also important to keep your neighbors happy. Put saucers underneath your pots to prevent excess water from dripping onto the neighbors beneath you. This will also cut down on wasted water, one of the main principles of sustainable gardening. Self-watering pots are helpful, especially if you’re not always around to water your plants. They prevent overwatering by metering the amount of water your plants receive, only feeding them when necessary.
You also need to consider how much weight you’re adding to your balcony. Yes, terra cotta pots have that quintessential Tuscan gardening look, but a dozen ceramic pots filled with water-soaked plants might bear more weight on your terrace than it’s prepared for. Look at more lightweight potting alternatives and different soil mixtures than can lighten the load on your balcony.
For more information on making the most out of your garden, read our blog post on urban farming:
A Quick Guide to Urban Farming
Featured Image Source: Getty Images – Image Credit: ibnjaafar
What Goes Into Owning a Waterfront Home?

A waterfront home offers surroundings unlike any other. Their prime locale and stunning views virtually guarantee a lifetime of relaxation, waterfront get-togethers, and summer nights under the stars. Waterfront homes have great potential as investment properties as well. But for all the perks waterfront homeownership offers, it comes with its own set of responsibilities, too.
Should I buy a waterfront home?
Beyond the lifestyle benefits, owning a waterfront home also has a significant financial upside. Because waterfront properties are more scarce than landlocked homes and their location is highly desirable, the buyer demand is generally high. As a homeowner of these special properties, you can rest assured that a well-maintained waterfront home will generate significant buyer interest when you’re ready to sell. A property with any combination of water views, boat slips, docks, and water access is a recipe for appreciation over time.
A waterfront property is a popular choice for homeowners who are in the market for a second home, or even as a primary residence for those looking to eventually move into their vacation home when the time is right. They’re also primed for converting into a short-term rental. Due to their location, they have a competitive advantage over many other short-term rentals. Depending on the local laws and any relevant Homeowners Association rules, waterfront homes can be rented out year-round or seasonally. For example, if you decide to rent out your home during the summer, you’re able to capitalize on seasonal demand.

Image Source: Getty Images – Image Credit: bradwieland
Owning a waterfront property also comes with extra risks you’ll need to keep in mind. Weather conditions can be extra harsh on these homes, given the fact that they’re situated face to face with nature in a way most homes aren’t. Make sure you have proper coverage through your homeowners insurance policy and inquire about the need to purchase additional wind, flood, or hazard coverage. Local climate dictates what a comprehensive coverage plan will look like for your home, but what’s important is that you’re fully covered.
Something else to keep in mind is that beyond the typical tasks associated with owning a home, waterfront structures like retaining walls, boat lifts, and docks require a certain amount of ongoing maintenance. As the seasons change, so will your responsibilities as a homeowner. Properly winterizing a waterfront property requires a few additional steps beyond the typical routine, depending on how low temperatures dip during winter in your area.
For more advice on home maintenance, repairs, remodeling and more, visit the Living section of our blog:
Featured Image Source: Getty Images – Image Credit: Markanja
Your Guide to Going Solar

For homeowners looking to reduce their home’s carbon footprint, increase its sustainability, and add value to their property, going solar is an obvious choice. Understanding how solar works and how to maximize its benefits are key first steps in your journey to becoming a solar energy-producing household.
How to Fix Your Toilet
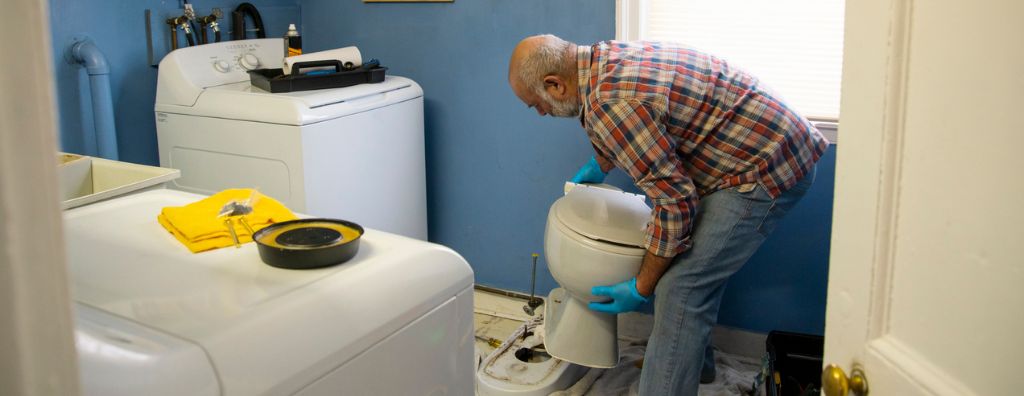
A homeowner’s life is filled with mini hazards that pop up at a moment’s notice. Our appliances make life easier, but they are subject to malfunction. A broken toilet interrupts your day and can cause serious water damage, which emphasizes the importance of timely repairs. The following tips to fix your toilet will help you get your water system and your home life flowing properly again.
If these repairs are beyond your capabilities, don’t hesitate to call a professional plumber.
Problem: there’s water around the base of the toilet
A leaking toilet can have you dealing with the perils of a water damage emergency in no time. If there’s water around the base of your toilet, that’s a telltale sign that the leak has sprung from the wax ring seal. You’ll have to remove your toilet to replace it.
How to Fix a Leaking Toilet
- Use a wrench to disconnect the water supply from the shutoff valve. Drain the tank until all water is removed from the bowl.
- Disconnect the water supply valve from the toilet tank. Using a screwdriver and wrench, remove the caps on the base of the toilet and the hex bolts beneath them.
- Grab the toilet by the bottom and lift it from the ground. Set it aside on material that will prevent damage to your bathroom floor, like a towel or blanket.
- Remove the old wax gasket from the flange and install a new one on it by centering it on the flange and pressing it down into place.
- Reinstall the toilet by placing it on the bolt holes, keeping it level as you go. Use your weight to press down on the toilet bowl before putting the bolts back in. This helps to compress the new gasket. Caulk around the base of the toilet if needed.
- Reconnect the water supply to the shutoff valve and open it before giving your new toilet a test flush. If there are no leaks, you’re done!
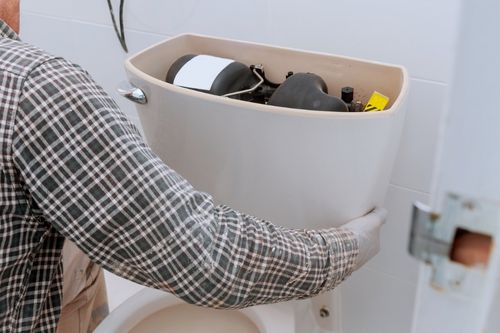
Image Source: Getty Images – Image Credit: photovs
Problem: the toilet won’t stop running
Another common issue homeowners face is a running toilet. The constant sound of running water coming from your bathroom isn’t just annoying; it wastes water and can cause spikes in your utility bills. A running toilet is typically due either to a faulty flapper or the water level being too high in the tank, causing overflow.
How to Fix a Running Toilet
- The most common cause of a running toilet is that the flapper chain is caught on something. To check for this issue, take the top off the tank to see if the chain is too taught. If so, see if you can release it, after which the flapper should fall into place and stop the run.
- If the flapper or the chain are compromised, they’ll need to be replaced. But no sweat, that’s easy! Start by shutting off the water supply and drain the tank by pulling up on the flapper chain. Remove the flapper by unhooking it or removing the ring that holds it in place. Pick up a new matching flapper at your local hardware store and reverse the process to install it and reconnect the chain. If this doesn’t solve your running toilet problem, it may be a larger issue, such as the flush valve.
Problem: the toilet isn’t flushing correctly
If your toilet isn’t flushing correctly, there’s likely something wrong with the flush handle or the water level, or it could be a clogging issue.
How to Fix Flushing Issues
- Tighten the flush handle if it’s loose and see if that solves the problem. When you do, make sure the flush lever is working properly. If there’s too much slack in your lift chain, it won’t trigger a proper flush. Make sure it’s not too loose, but not so tight that it can’t flush properly either.
Problem: the toilet has started wobbling
Sometimes homeowners will suddenly notice their toilet feels uneven or is rocking slightly. This is usually because the flange that connects to the drainpipe is sitting higher than the floor.
How to Fix a Wobbly Toilet
- The best fix is to wedge shims under the base of the toilet and caulk the area to solidify it.
For more tips on home maintenance, read the following blog post about controlling mold:
How to Prevent and Deal with Mold
Featured Image Source: Getty Images – Image Credit: Fertnig
")


