
 Facebook
 X
X
 Pinterest
 Copy Link

There is often a temptation for sellers to overprice their home, but Windermere agent, John McKenna, shares why that is a big mistake. Get insight into the psychology of the homebuyer and how to find a real estate agent that understands the science of pricing your home.
Living •
December 27, 2016
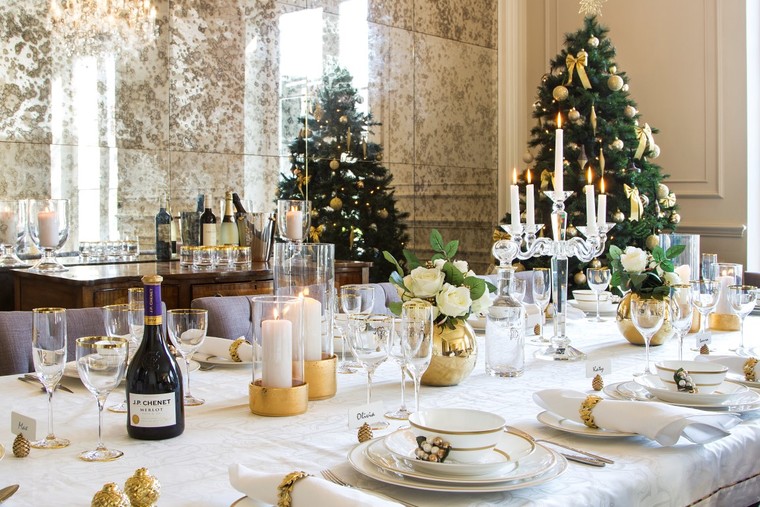
Hosting New Year`s Eve at Home, with Style

Invite a few close friends to ring in the New Year with an easy, intimate party at home.
Preparation
Considering that New Year’s is a pretty hot-ticket holiday, it’d behoove you to let your friends know sooner rather than later that you’ll be hosting a party at your place. Paperless Post is a good alternative for those who don’t want to track down friends’ addresses, go out to buy a roll of stamps, or leave the house. For those on a budget, there are several free invitation designs to choose from.
Safety
Hire a carpool so no one has to drive home. This is best done by using a traditional car service that can be scheduled for pick up and home delivery. Other ride share companies like Uber and Lyft offer similar services but they cannot be reserved and on a busy night you might find your friends coming in late and leaving far later than desired.
Drinks
For a refreshing alternative to Champagne, try Prosecco. For nonalcoholic selection try Twelve, a fizzy blend of fruit and herbal tea. It’s delicious and certainly more elegant than sparkling cider. Pellegrino and Perrier are also very nice to keep people happy and hydrated.
Food
Don’t let people get hungry! Make it easy on yourself and your wallet. Get some fabulous, frozen pre-made appetizers and keep them rolling from the oven. Cheese and cracker, charcuterie and veggie platters that require no cooking and can be made ahead of time are always crowd pleasers. These can even be purchased from your local deli if time is more important than slicing and arranging your own cheese.
Sweets
We’ve all been eating way too much sugar all December but if you want to do a small dessert and make it look special, dust some edible glitter onto your store bought cookies or cake. Yes, edible glitter is a thing.
Music
Set up Pandora at a volume where you can hear it – but don’t have to raise voices to hear each other. Hipster Cocktail Party is a great one. Don’t let the name turn you off; the music they play is terrific. Bill Withers, Nina Simone, Van Morrison and Aretha Franklin are some regulars you'll find on this station.
Parting Gifts
Send everyone home with recovery bags: Insert a packet of emergenC, a pre-packaged duo of Tylenol and breath mints and attach it to a bottle of water.
Originally posted on Windermere Seattle Spaces and Places.
Living •
December 22, 2016
How to Live Through a Home Remodel
If you’re thinking about remodeling or are about to break ground on your first renovation, odds are you probably know a bit about how the project is going to go. After all, you’ve watched a few TV shows, your cousin’s husband is a general contractor and the guy you sit close to at work tells you every detail of how his wet bar is coming together. So you pretty much know all there is to know, right? Not so fast.

Live Remodel 1: JLB Property Developments, original photo on Houzz
As much as you may be able to glean from friends and family, articles and TV, there’s no experience quite like personally getting down into the dirt (more on this later) of a remodel. And what you don’t often hear about are the harsh realities of wading through such a detailed, often stressful project.
We’ve written before about how remodeling a home is the ultimate litmus test for your relationship. And that’s why I think understanding a few of the common negative things that happen during remodel is a vital component of being prepared.
I’ve not only braved a few remodels myself, but I’ve worked on the other end as a general contractor, and while I can’t claim I know everything, I do think I have a lot to share. Here are a few things you should know about what it’s really like to live through a renovation.
Related: How to Survive the 'Punch List' Phase of a Remodel
Live Remodel 2: Turnbull Griffin Haesloop, original photo on Houzz
It Will Upset Your Daily Schedule
Say, for example, every day before you leave for work you like to brew a cup of tea, settle in with your tablet at your breakfast nook and prepare for the day by going through your emails.
Now picture this exact routine while your kitchen and breakfast nook is under construction. The peace and tranquility (and cleanliness!) of your morning retreat is no more.
You may have to alter your daily routine a bit by finding a coffee shop near your house where you can relax, or by relocating to your bedroom for your beloved cup of chai.
Creatures of habit, be warned: You may have to (take a deep breath here) change a couple of your habits while your remodel is going on.
Related: Remodeling Your Kitchen? Move Your Coffee Station to Your Living Room
Contractors often like to take up shop (if permitted) in garages, as they are often places where they can make a bit more of a mess and noise while remaining close to the job site. If you want certain parts of your home, yard or garage to remain sacred, talk with your contractor about areas where work can and cannot occur.
Live Remodel 3: Kasper Custom Remodeling, LLC, original photo on Houzz
There Will Be Dust
This one may be a no-brainer to some and a shock to others (again, take a deep breath). Some contractors will give hints that the project will get dusty, such as: “We will take measures to put up dust barriers around the area of the remodel” or “we will keep a broom and dustpan on site at all times.”
But no matter how many protective products are put up, there are certain stages of construction that can get intense (for example, sanding down drywall). Not only does dust get thrown into the air while work is going on, but it stays floating around in the air for a while afterward. And floating dust’s favorite pastime is, regrettably, travel.
It may travel to different areas of the house, settling into your dog’s bed, onto your kitchen counters and even into your lungs. You may be thinking, “So what? I breathe dust all the time. That’s just life.” This is true, but the dust you’re usually inhaling is dirt and dead skin cells and other organic stuff. Remodeling dust can be made of not-so-nice things such as chemicals found in paint, fiberglass insulation or cement.
Have a conversation with your contractor to see whether he or she plans on using an air scrubber during your remodel as well as dust barriers and traditional cleaning. This combined system helps to prevent dust from traveling, and it also takes a lot of the nasty particulate out of the air before it has time to invade other areas of your house.
While most contractors genuinely work to keep your home clean, safe and comfortable during a remodel, sometimes dust control isn’t a top priority. It will quickly become front and center in your home, though, if it isn’t properly managed from the start.
Related: Bathroom Renovation? Get Ready for the Day in Peace With a Bedroom Vanity
Live Remodel 4: studiovert design, original photo on Houzz
It Can Be an Emotional Roller Coaster
Every person handles stress and emotions differently, but the fact is that having a bunch of unfamiliar faces tear your house apart before your very eyes is stressful. I know that sounds like a bit of hyperbole, but when you’re actually living through a remodel, that’s exactly how it feels.
It can be tough to keep your head on straight when you’re trying to make selections for tile and lighting fixtures that suit your budget while simultaneously worrying about whether the project will end on time. Add family and work life to that? Yikes.
Now that I’ve worked you up, let me provide some peace of mind: Contractors know what they are doing. They will do everything they can to make sure you are happy with your home and the job is completed in a timely manner. Your local YMCA provides yoga classes, which can be very helpful with managing stress. Feeling better?
Accept that you will feel some stress and some emotions, and allow yourself to be OK with that. It’s a part of the process. Freaking out about the fact that you’re freaking out will only make things, well, freakier.
Live Remodel 5: Amanda Armstrong Sava, original photo on Houzz
Now that I’ve shaken up any romanticized beliefs you may have held about remodeling, let me instill a bit of faith by saying that it’s not all bad. Remodeling can actually be quite pain-free, in fact, if you communicate. I know I’ve harped on this before, but I can’t stress the importance of it enough. Talk with your contractor before work starts about things such as scheduling, dust control and communication preferences. It makes a world and a half of difference.
So, yes, there will be dust, and yes, you might get tired of seeing your project manager every day, but there will be days when you come home after work and see new countertops being installed, and it will stop you dead in your tracks because — whoa — those look great!
Other times you might have the house to yourself for a second and you can poke around to “ooh” and “ahh” over all of the new, shiny things filling your beloved home. So not only is it not all bad, some of it is actually pretty good. So good, in fact, that you might even start thinking about your next project before the first one even ends.
By Hannah Kasper, Houzz
Living •
December 19, 2016
Make Your Home Safe for the Holidays

With all the cheer and celebration at this time of year, it’s hard to believe anything bad could happen. However, statistics show there’s a significant increase in home-related accidents, fires, and burglaries around the holidays. To protect your family, friends and property, heed these six suggestions:
- Keep walkways, driveways and decks free of slippery ice or moss.
- Have your fireplace professionally cleaned, and only use one artificial log at a time.
- Check the batteries in all smoke detectors and make sure a working fire extinguisher is located on every floor, as well as the kitchen and garage.
- Snuff out any candles before leaving the room (even for a short while), and make sure to always keep them in short holders with wide bases so they don’t fall over.
- For holiday lights: Only use outdoor lights / extension cords in the outdoors, and plug them into GFCI protected outlets; make sure all lights are UL-approved; know that the smaller bulbs are safer; never leave them on when you’re not home.
- Plug a few lamps and the TV or stereo into timers to make it appear someone is home while you’re away. Also, ask a neighbor to park their car in your driveway, pick up any mail and keep an eye out for any suspicious activity.
Making the extra effort to keep your home safe will always be the best gift you could give family, friends and other visitors.
Market News •
December 16, 2016
It’s Complicated: What’s Stopping Millennials from Entering the Housing Market?

More than thirty five percent of the 75.5 million Millennials in the United States still live at home, with their parents. So what is keeping them from making the move to a home of their own? According to Windermere’s Chief Economist, Matthew Gardner, it’s a unique combination of personal and financial factors.
More •
December 12, 2016
Perspectives: 2017 Forecast

Well, it’s December; the time of year when we look to our crystal ball and offer our housing market predictions for the coming year. And by crystal ball we mean Windermere’s Chief Economist, Matthew Gardner, who has been travelling up and down the West Coast giving his annual forecast to a variety of real estate and financial organizations. Last month’s surprising election results have created some unknowns, but based on what we do know today, here are some thoughts on the current market and what you can expect to see in 2017.
HOUSING SUPPLY: In 2016 the laws of supply and demand were turned upside down in a majority of markets along the West Coast. Home sales and prices rose while listings remained anemic. In the coming year, there should be a modest increase in the number of homes for sale in most major West Coast markets, which should relieve some of the pressure.
FIRST-TIME BUYERS: We’re calling 2017 the year of the return of the first-time buyer. These buyers are crucial to achieving a more balanced housing market. While rising home prices and competition will act as a headwind to some first timers, the aforementioned modest uptick in housing inventory should help alleviate some of those challenges.
INTEREST RATES: Although interest rates remain remarkably low, they will likely rise as we move through 2017. Matthew Gardner tells us that he expects the 30-year fixed rate to increase to about 4.5 percent by year’s end. Yes, this is well above where interest rates are currently, but it’s still very low.
HOUSING AFFORDABILITY: This remains one of the biggest concerns for many West Coast cities. Some markets continue to see home prices escalating well above income growth. This is unsustainable over the long term, so we’re happy to report that the rate of home price appreciation will soften in some areas. This doesn’t mean prices will drop, but rather, the rate of growth will begin to slow.
Last but not least, we continue to hear concerns about an impending housing bubble. We sincerely believe these fears to be unfounded. While we expect price growth to slow in certain areas, anyone waiting for the floor to fall on housing prices is in for a long wait. Everything we’re seeing points towards a modest shift towards a more balanced market in the year ahead.
Living •
December 9, 2016
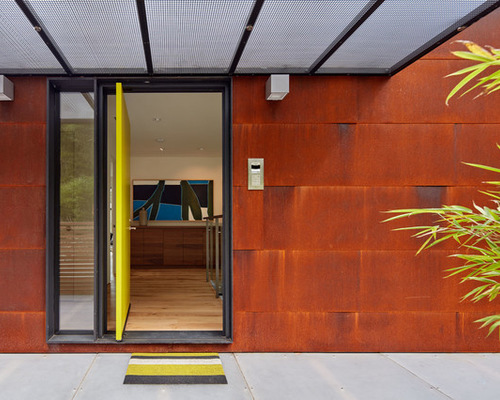
How to Step Up Your Entry Design With a New Welcome Mat

Right before the guests ring the doorbell or give the front door an old-fashioned knock, they step on your welcome mat. This mat serves two purposes: catching debris and adding style. Here are some ideas for how to give this entry detail a refresh before the hustle and bustle of the holiday season begin.
Welcome Mat 1: Caela McKeever, original photo on Houzz
Say Hello
A lettered mat can help you say exactly what you want to say when someone comes to your door. Obviously nothing says hello more than the word “hello.”
The simple greeting might also draw visitors’ eyes to the ground and remind them to take off their shoes before they step inside.
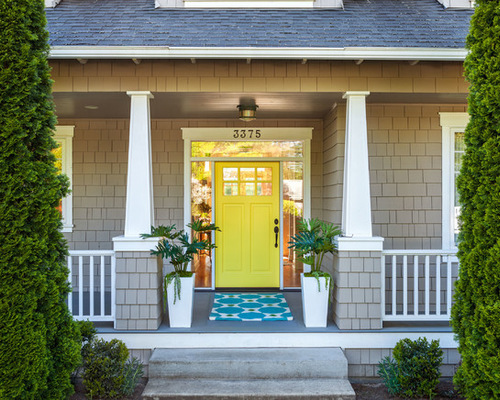
Coordinate Colors
If you have a colorful front door, use that as doormat inspiration. If your door lacks color, maybe it’s time to paint it.
Door paint: Scarlet Ribbons, Dulux
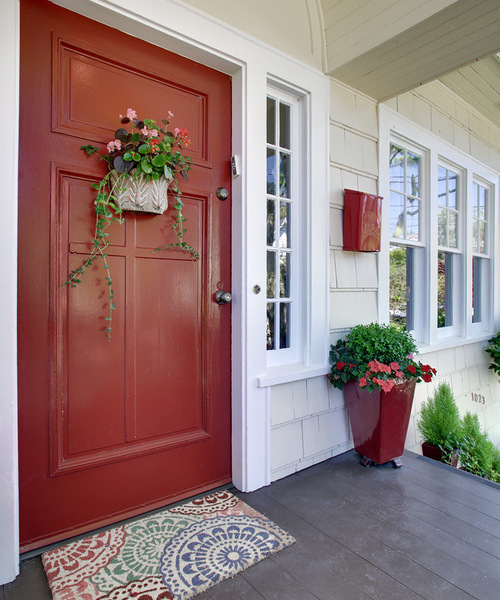
Welcome Mat 2: Zack | de Vito Architecture + Construction, original photo on Houzz
The whole mat doesn’t need to match the door. This striped mat draws on other colors found on the home’s exterior.
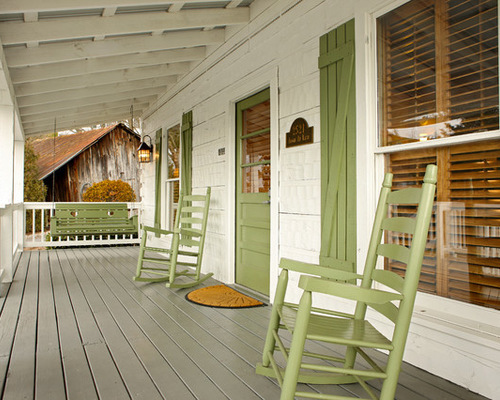
Welcome Mat 3: Rustic Porch, original photo on Houzz
Think Outside the Rectangle
Many front doors feature rectangular doormats, but other options exist. The semicircle mat in the photo works nicely with the rustic rockers, porch swing and shutters.
Welcome Mat 4: Garrison Hullinger Interior Design Inc., original photo on Houzz
Roll Out a Rug
A big, bold rug in front of the door adds color and life to this home’s entry, designed by Garrison Hullinger.
A large porch rug can also make the space feel like another room of the house. If you add a few chairs, people can stop, relax and enjoy the outdoors. Plus, more rug means more chances for it to pick up any water or dirt from the shoes of incoming guests.
Welcome Mat 5: Seattle Staged to Sell and Design LLC, original photo on Houzz
Play With Patterns
An intricate design gives guests a reason to notice this front door mat. A mat’s design can also pull together all the elements of a porch, such as the front door, mailbox, planted blooms and exterior paint.
“I chose the mat because it is fun, colorful, and it accentuated the colors of the house and the plants,” says Shirin Sarikhani, the owner of Staged to Sell and Design in Seattle.
Keep It Natural
If the entry is already bursting with details, such as eye-catching hardware and light fixtures, a neutral mat will help keep the attention on them. Natural doesn’t have to mean boring.
Welcome Mat 6: Grandin Road, original photo on Houzz
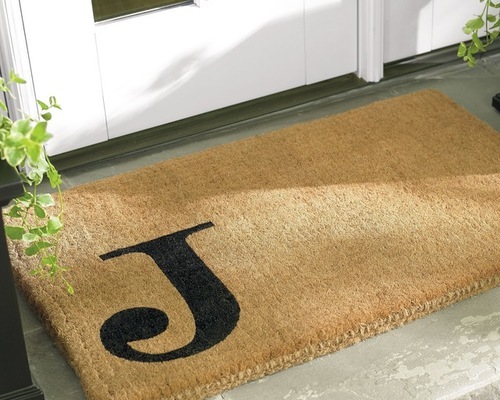
Personalize the Space
This contemporary monogrammed mat is hard to miss. “Don’t be afraid to choose a doormat with personality, says Kate Beebe of Grandin Road. “Work some wit and whimsy into your entrance, and choose something that will put a smile on your guests’ faces.”
She also recommends picking a mat that covers at least three-quarters of the entrance’s width and allows the door to open easily.
Change With the Seasons
While you are changing the front porch decor, swap a plain doormat for a festive option.
After the holidays, clean off your seasonal doormat and store it until the following year.
Match Materials
Doormats come in many materials, including ones that mimic entryway hardware. A rubber mat offers the wrought iron look without the weight and expense of the real material.
The punched-out spaces in a rubber mat also catch a lot of little pebbles, which can then be easily swept away with a broom.
Make It Feel Like Home
Doormat options are pretty much endless, so it shouldn’t be hard to find one that works for you.
By Brenna Malmberg, Houzz
More •
December 7, 2016
Spreading Holiday Cheer this Season


Our Windermere offices really love the holiday season. It’s a time when they can get together to collect food, host holiday events, and raise money to help those in need in their communities. From putting together Thanksgiving meals, to hosting food drives and auctions, our agents really get into the spirit of giving. Here are just a few of the events taking place throughout our network during the holiday season.
Jump Into the Holidays Bazaar
On November 19, the Windermere Kelso/Longview office hosted its first holiday bazaar to benefit the Windermere Foundation, to provide support to local non-profits in the community that serve low-income and homeless families. More than 20 vendors participated in the bazaar, offering items to purchase for holiday giving. Over $1,300 was raised at this event.
Thanksgiving Meals for Dorothy House
For the past 15 years, brokers from the Windermere Bellingham-Bakerview, Bellingham-Fairhaven, Birch Bay-Blaine, and Lynden offices have gotten together to provide the ingredients to put together full Thanksgiving meals for Dorothy House, a local safe housing community for domestic violence victims. This year they assembled 24 meals for Dorothy House, which has 22 apartments for women and children.
Woodinville Winterfest
For over 10 years, the Windermere Woodinville office has hosted a holiday event at its office featuring photos with Santa and refreshments. This year, their annual event was a part of the November 27 Woodinville Winterfest and included a Woodinville Wine Country wine and beer garden, and local bites. Cash and toy donations were collected for The Forgotten Children’s Fund.
An Evening with The Great Gatsby
This past month, the Windermere Stellar offices in Vancouver, Washington hosted their fourth annual live and silent auction to benefit the Children’s Justice Center. Nearly $200,000 was raised at this event. Through the Windermere Foundation, over $481,300 has been donated to the CJC over the past four years, which has helped them expand their family outreach and support program.
Windermere Wreath Fundraiser
The Windermere Ellensburg office is holding its second annual wreath fundraiser. Fresh 24-inch wreaths handmade by Snowshoe Evergreen can be purchased from the Windermere office from November 28 until supplies last. All proceeds benefit the Windermere Foundation, to assist local non-profits that provide services to children in need in the Ellensburg area.
16th Windermere for Kids Event
Since 1998, brokers from the Windermere Bellevue, Bellevue South, Bellevue West, Issaquah, Redmond, and Yarrow Bay offices get together to hold a “Windermere for Kids” event in lieu of a company Holiday party. With help from local non-profit organizations, 100 children in need between the ages of 7 and 12 are selected to participate. Each child receives a $225 gift card to Target and is partnered with a broker who helps the child select gifts for members of their family. And a gift for each child is purchased as well. The gifts are then taken to wrapping stations that are manned by Windermere brokers. While the children wait for their gifts to be wrapped, there are photos with Santa, crafts, food and beverages to keep them busy. Almost $250,000.00 has been donated throughout the years.
Free Santa Photos & Dickens Carolers
The Windermere Northlake office hosted its annual holiday event on December 3, featuring free photos with Santa and Dickens Carolers. Food donations are collected each year to benefit Hopelink, a non-profit social service agency that provides services to families in need in North and East King County, WA.
Windermere Stellar Lloyd Tower Silent Auction
The Windermere Portland – Lloyd Tower office is hosting a silent auction benefiting the Windermere Foundation on December 8. This night market will be full of gifts to bid on, including wine bundles, dinner parties, sporting events, gift certificates, and more.
8th Annual Spaghetti Feed/Auction
Hosted by the Windermere Snohomish office on December 10, this fun community event features live music while Windermere brokers cook and serve the meals. Tickets are $10 for a full dinner with dessert. Proceeds benefit the Snohomish Food Bank.
Mercer Island Youth and Family Services Holiday Program
The Windermere Mercer Island office will host its 19th annual event for Mercer Island Youth and Family Services on December 12. The office gathers wished-for gifts and delivers them to MIYFS, which serves hundreds of local families.
3rd Annual Food Drive for Contra Costa & Solano Counties
From October 1 through December 15, agents from the Windermere Walnut Creek-Diablo Realty and Windermere El Sobrante offices are collecting food for the Food Bank of Contra Costa & Solano Counties. Nearly 100 agents will collect food donations during this drive. The food bank serves 188,000 people each month and distributes over 50,000 pounds of food every day. Last year, these offices collected nearly 1,000 pounds of food. They hope to surpass this number this season.
Windermere Professional Partners Holiday Food Drive
Each year, the Windermere Professional Partners offices in North Tacoma, Central Tacoma, University Place, and Gig Harbor hold an annual food drive to support a local food bank. All four office locations serve as donation drop-off sites, and agents also distribute paper bags throughout the community for the public to fill and bring in donations. This year the drive will support FISH Food Bank in Gig Harbor, as well as Families Unlimited Network in University Place.
5th Annual Gingerbread House Contest
The Windermere Wailea office is hosting its 5th Annual Gingerbread House Contest to benefit the Windermere Foundation. Drop by their office in the Shops at Wailea to view all the gingerbread houses created by the office’s agents and their families, and cast a vote for your favorite one. Voting ends on December 20. Ballots submitted will be entered into a raffle drawing for a $100 gift certificate. For every live/in-person vote cast in the office, a dollar will be donated to the Windermere Foundation.
 Thank you to everyone that supports the Windermere Foundation. Through these events, drives, as well as a variety of other fundraisers held by our offices throughout the year, the Windermere Foundation is able to continue to support non-profit organizations that provide services to low-income and homeless families throughout the Western U.S.
If you’d like to help, please consider donating to the Windermere Foundation. To learn more about the Windermere Foundation, visit http://www.windermere.com/foundation.
Living •
December 6, 2016
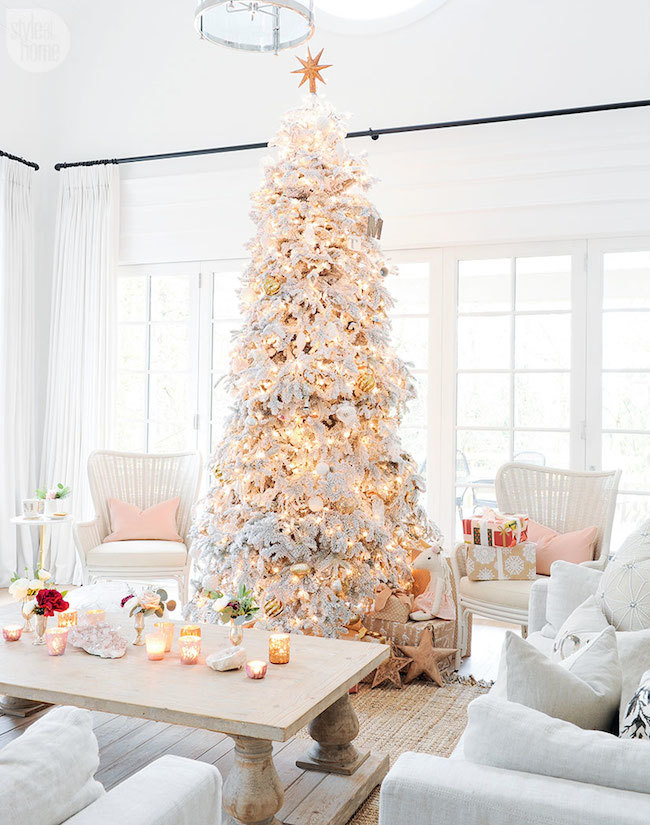
Holiday Décor Trend: White-on-White Luxe
From a stunning mantel display to an elegant table setting, you can capture the magic of the holiday season in festive touches that are certain to make your home even more merry and memorable. The white-on-white design trend is definitely at the top of most luxury designers’ lists these days, and this extends to Christmas décor, as well. For some stylish inspiration, take a cue from these beautiful holiday decorating ideas.

This year it’s all about seasonal glamour, metallic flourishes meet elegant finishes for a luxury look to perfectly complement Christmas time at home.
Metallic decor is very popular for decor today because it’s stylish and gives a refined and elegant touch to any space. Silver and gold are the most used shades but copper has become a leader recently because of its soft and warm shade.

White and gold décor can be bland without a deeper anchor color. Black accents lay low while bringing out the brightness of the white and metallic accents.

A huge part of the white on white decorating trend this year is the flocked Christmas tree.
If you are feeling devoid of color, adding a small amount of red to a flocked tree makes a huge impact.

A light touch of pastel blue gives a softer impact while evoking the feeling of Christmas at Tiffanys.

With all this white on white minimalism, you might start to feel a little snow blind – or simply bored. Another trend on the horizon is blue and green, inspired by the favored Peacock décor from the Victorian era.

The vivid colors are stunning on a white tree and blends very well with metallic accents in the home.

So what do the experts advise for decorating a tree? Here are a few tips to help guide you:
When in doubt, go for more lights. Nothing beats a well-lit tree.
Take a break and step away from the tree. It never hurts to revisit an hour later. You can often make just the right tweaks when you come back and look at something with a new set of eyes.
Don't take decorating your tree too seriously. It is a tradition and is meant to evoke memories. Showcase your personality with your favorite ornaments and have fun with it.
Do what you love. You can be as creative as you want with your Christmas tree, so decorate it with whatever you’re into; shells, birds, or anything else. Just because you’re trimming a tree doesn’t mean you have to incorporate traditional standards.
Design •
November 29, 2016
5 Midcentury Modern Homes That Make the Most of Their Small Design

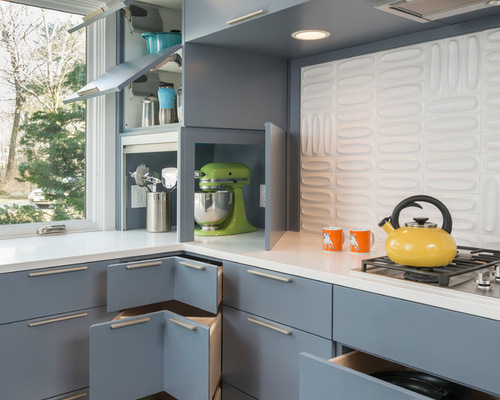
Midcentury modern homes were small out of necessity. Money was in short supply after World War II, so architects and builders had to keep houses compact yet functional to stay within homeowners’ budgets. At the same time, lifestyles were changing. Smart architects took on a new approach and designed homes with an open feel, which differed greatly from the boxy designs of the previous era.
Related: Why You Should Embrace Your Midcentury Modern Kitchen

Midcentury Modern 1: Flavin Architects, original photo on Houzz
I’ve been enamored with midcentury modern homes since my childhood in California, where I was privileged to spend time in the intimate houses designed by Frank Lloyd Wright apprentice Mark Mills. Mills was the on-site architect for Wright’s famous Walker House, or Cabin on the Rocks, in Carmel, California, pictured. It was during this time that Mills learned an important lesson from Wright: Reject a larger house in favor of a modest home with flowing spaces and no excess.
The following ideas show how midcentury modern homes beautifully make the most of their space in ways that can easily be incorporated in homes today.
Midcentury Modern 2: Wheeler Kearns Architects, original photo on Houzz
1. Open floor plan.
Above all else, the open floor plan is the defining characteristic of midcentury modern homes. Closed-off rooms gave way to flowing spaces that strung one room to the next to form fluid kitchen, living and dining areas.
In a small home, the key to making the open floor plan work is to understand which rooms need privacy, and when. Of course, bedrooms and bathrooms need separation from the main areas of the home, but it’s also good to consider other areas that need privacy: for example, a study where a parent can work without interruption while the kids play nearby.
In this lake house by Wheeler Kearns Architects, the common areas are located in a centralized area, while the more private areas are off to the side or tucked away on another level.
Midcentury Modern 3: Balodemas Architects, original photo on Houzz
2. Expanded sightlines.
The tendency of midcentury modern homes to have open floor plans speaks to the elegant details often seen within these houses. Without trying to be too sparse, midcentury designers included functional details in their homes that were as uncomplicated as they were beautiful. Finding the balance between sophistication and openness was in the hands of the architect.
Take, for example, the stairs in midcentury modern homes. In this remodel of a midcentury home by Balodemas Architects, they preserved much of the original stair and design. The riser, or the vertical part that connects the stair treads, was simply left out for a lighter appearance. The stair was no longer in a hall but fully opened up and integrated into a room. Walls were often dispensed with entirely. Instead, partial-height screens inspired by Japanese shoji were used to subtly separate spaces.

Midcentury Modern 4: Steinbomer, Bramwell & Vrazel Architects, original photo on Houzz
3. An instance to avoid “open.”
While photographs of midcentury modern homes often feature great walls of glass, what’s often not shown, perhaps because they are not as photogenic, are the equally generous opaque walls.
These walls are key to the home’s aesthetic success. They provide a protective backing to the composition, since the opaque side of the home often faces the road, as with this house by Steinbomer, Bramwell & Vrazel Architects. Although the back of the house is open, with lots of glass and a sense of ease between inside and out, the street-facing side would never give that away. An opaque wall creates a boundary to the outside world while extending the perceived size of the home. Walls of glass are expensive, so opaque walls are also an economical design move.
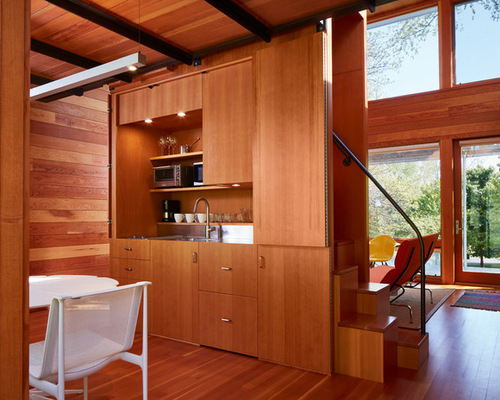
Midcentury Modern 5: Flavin Architects, original photo on Houzz
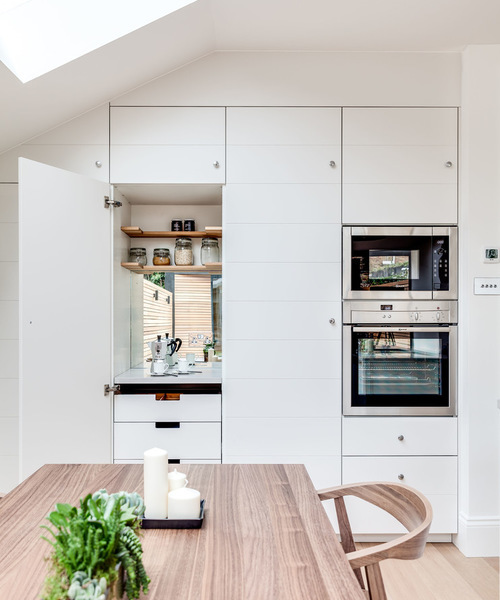
4. Everything in its place.
Thoughtful storage is a another key aspect of what makes a small midcentury home completely livable. Most midcentury modern homes, particularly those on the West Coast, had no basements or attics, so storage closets needed to be located among the main living spaces. In part, the answer was to do more with less by having well-designed storage throughout and daily items close at hand, as in this kitchen. This has to be married to an ethic of keeping only what you need and having periodic yard sales.
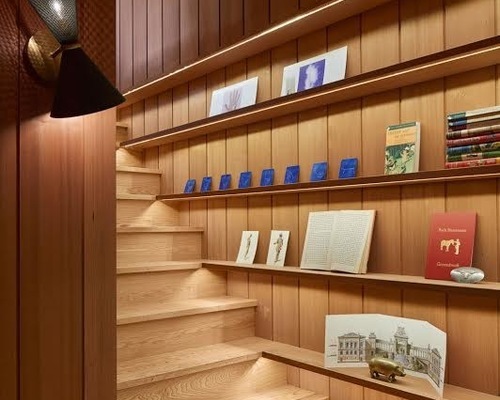
Midcentury Modern 6: Koch Architects, Inc. Joanee Koch, original photo on Houzz
5. Display with a purpose.
In a small home with innovative but limited storage, it’s important to have display areas for the pieces that don’t need to be tucked away in drawers or closets. This was done beautifully in midcentury modern homes by integrating display areas as a means of aiding with the potential conundrum of scarce storage.
This restoration by Koch Architects shows this exact notion at work. Every other step in the stair has an integrated bookshelf. This would make a perfect rotating library with a range of titles easily seen while ascending the stair.
By Colin Flavin, Houzz
")


