
 Facebook
 X
X
 Pinterest
 Copy Link
Here’s Your Fall Home Maintenance Checklist
The leaves changing color is a sign that you may have some fall home maintenance tasks to tackle. With summer in the rearview and colder temperatures ahead, being proactive now will keep your home in pristine condition throughout the autumn days and nights. We’ve compiled a list of several tasks to tackle around your home this fall.
Fall Home Maintenance Checklist
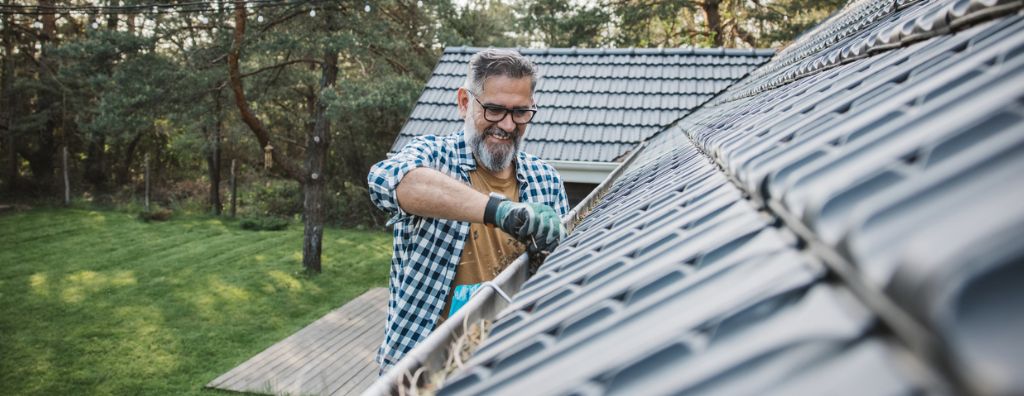
Clean Gutters
Water damage can spell serious trouble for homeowners. And with many climates experiencing additional rainfall this time of year, it’s time to prepare accordingly.
- Start by ensuring that gutters and downspouts are functioning properly. (Don’t attempt this task yourself if you have a multi-story house with a steep roof; hire a professional instead.)
- If your home is surrounded by trees, you may need to clean out your gutters a few times a year, especially in the fall. Check to make sure your gutters are flush with the roof and attached securely, repairing any areas that sag or sections where the water can easily collect and overflow.
- Clean out the gutters and downspouts, checking that outlet strainers are in good shape, and are firmly in place. Finally, check that your downspouts direct water away from your house, not straight along the foundation.
- If you haven’t already, you may want to consider installing gutter guards. Gutter guards create a barrier so water can get through to your gutters, but debris can’t, limiting gutter buildup (and the time you spend cleaning out your gutters). There are DIY installation kits available, or you can always hire a professional to install a gutter guard system.
- If you have a sump pump under your house, now is a good time to test it. Run a hose to make sure draining water travels directly to the pump and that the pump removes the water efficiently and expels it well away from the foundation. For more information about how sump pumps work, go to howstuffworks.com.
Check for Leaks
The best opportunity to catch leaks is the first heavy rain after a long dry spell, when roofing materials are contracted. Check the underside of the roof, looking for signs of moisture on joints or insulation. Mark any leaks that you find and then hire a roofing specialist to repair them. Waiting for leaks to show up on your ceiling is a recipe for disaster. By then, it’s too late to act; insulation and sheet rock will have already sustained damaged, and you could have a mold problem on your hands.
Don’t forget the basement. Check your foundation for cracks, erosion, plants growing inside, broken windows, and gaps in the window and door weatherstripping. Make sure to properly seal any leaks while the weather is nice. This will ensure materials dry properly.
Fall Home Maintenance: Pest Prevention
Rodents are determined and opportunistic, and they can do tremendous amounts of property damage (and endanger your family’s health). As temperatures cool, take measures to prevent roof rats and other critters from moving in. Branches that touch your house and overhang your roof are convenient on-ramps for invaders, so trim back branches so they’re at least four feet from the house. If you do hear scuttling overhead or discover rodent droppings in your attic, crawl space or basement, take immediate action.
Maintain Your Heating and Cooling Systems
Preventative maintenance is especially crucial for your home’s heating and air-conditioning systems. Fall is a smart time to have your systems checked and tuned up if necessary. Don’t wait for extreme temperatures to arrive when service companies are slammed with emergency calls. Between tune-ups, keep your system performing optimally by cleaning and/or replacing air filters as needed.
If you have a wood-burning fireplace, a professional inspection and cleaning will help prevent potentially lethal chimney fires and carbon monoxide poisoning. Even if you don’t use your fireplace often, always keep a supply of dry firewood or sawdust-composite logs so you have a backup heat source in an emergency.
Insulate & Seal Your Home
Insulating your home is a cost-efficient investment, whether you’re trying to keep the interior warm in the winter or cool in the summer. Aside from more major improvements like energy-efficient windows and insulation, there are some quick fixes and projects that you can tackle DIY.
If an exterior door doesn’t have a snug seal when closed, replace the weather stripping; self-adhesive foam stripping is much simpler to install than traditional vinyl stripping. If there is a gap under the door (which can happen over time as a house settles), you may need to realign it and replace the vinyl door bottom and/or door sweep. Air also sneaks inside through electrical outlets and light switches on exterior walls. Dye-cut foam outlet seals placed behind the wall plates are a quick and inexpensive solution.
For more tips on seasonal home maintenance, home repair tips and more, visit the Living category of our blog:
Featured Image Source: Getty Images – Image Credit: svetikd
Wildfire Preparation and Evacuation Tips

The following tips are meant to inform your household’s wildfire evacuation protocol, whatever your evacuation timeline may be.
6 Home Cleaning Tips to Eliminate Household Odors

A home that smells fresh feels fresh. But as all homeowners know, even after spending hours cleaning your home top to bottom, musty and unclean smells somehow find a way to hang around. We’ll take a look at some of the most common household odors and offer home cleaning tips to eliminate them room by room. Plug your nose, throw on a pair of rubber gloves, and let’s dive in!
1. Get Rid of Kitchen Odors
In many ways, the kitchen is the heart and soul of a home, but all that cooking and baking comes with a consequence: bad odors. From rotting food to stale air, the kitchen can easily whip up bad smells to combat. Start by emptying your refrigerator and use warm, soapy water to wipe down the shelves. Dispose of expired food products and clean up leaking food containers. Deep clean your dishwasher next, scrubbing those tough-to-reach spots in the back and clearing out the food traps. Next time you take out your garbage and compost, give the trash cans a quick wash with soapy water. Natural cleaning solutions can also help to supercharge your cleaning efforts. Baking soda can easily cut through grease, while lemon and salt can make a powerful mixture to eliminate odors. For more, read the following blog post:
2. Bathroom Cleaning Tips
The toilet and the shower are the main culprits in the bathroom for unwanted odors. Proactively cleaning and regularly maintaining your toilet can prevent bad smells and potential water damage from material buildup. Don’t let that toilet scrubber collect dust; regularly clean the rings in your toilet bowl and use toilet spray to maintain freshness. Your shower is a magnet for mold growth, especially around the ring of your bathtub and along the bottom of your shower curtain. Use a one-part white vinegar to four-parts water mixture in a spray bottle to clean your shower curtain, or simply throw it in the wash for a solo cycle next time you do laundry.
3. Carpet Cleaning
Your carpet and flooring may not immediately come to mind as candidates for emitting household odors, but they are. It is generally recommended to clean all household rugs and carpets every six to twelve months. If you do not have a carpet cleaner at home, they are widely available for rent at local hardware and/or carpet cleaning stores. If you have hardwood floors, purchase a hardwood cleaning solution to mix with water. Consider picking up some knee pads, too!

Image Source: Getty Images – Image Credit: Publishing Group
4. Eliminate Pet Odors
You can’t live without your furry friends, but sharing a home with them means you have to deal with some extra smells. Most importantly, clean up pet accidents right away to prevent lingering odors and potential damage. Regularly cleaning all pet toys eliminates germs and leaves them smelling fresh. The same goes for pet bedding and blankets: regularly run these items through the wash to absorb pet odors. And next time you’re at the store, consider picking up a pet-specific cleaning solution to really zap that pet must from the air.
5. Improve Home Air Quality
All odors travel to our noses by air. Improving air quality improves the health of your household while helping to eliminate odors. Consider investing in an air purifier with HEPA filters to remove dust, pollen, mold, and bacteria from the air in your home. Crack a window when cooking to let air cycle naturally and prevent it from getting stale.
6. Bedroom Cleaning Tips
In the bedroom, bad odors usually stem from fabrics and dirty clothes. Consider storing dirty laundry in the laundry room to banish all smelly clothing and add in a fabric freshener cleanse to your seasonal cleaning methods. After all, the bedroom is where you’re breathing air for hours at a time each night, so it’s worth it to purify your surroundings as much as possible. Also consider adding candles or essential oils to really sweeten the air in the bedroom.
For more helpful home cleaning tips, learn how to get your appliances cleaner than ever:
7 Tips for Cleaning Your Appliances
Featured Image Source: Getty Images – Image Credit: PeopleImages
Tips for Home Pest Control and Prevention
Any evidence of a pest infestation is a bad omen for homeowners. The last thing you want on your mind is the thought that critters could be crawling through your home, wreaking havoc as they go. Being proactive about home pest control can help you prevent an infiltration, and knowing what to do at the first signs of pest activity will help you limit the damage they cause.
Tips for Home Pest Control
Being a homeowner comes with the responsibility of protecting your property. Whether it’s a home security system to deter home burglaries, regularly cleaning to prevent mold growth, or testing for asbestos, you’ve got a lot on your plate. But these aren’t just nagging to-do-list items, they are important proactive steps that will help you avoid costly repairs. Preventing pests is no different; even the smallest bugs can do big damage. So, how do you stop them?
The best defense is a good offense, and keeping pests from getting inside will help reduce the damage they can cause. Though you may not be able to shut out every single bug, you can make it difficult for them. Cover holes with durable materials like steel wool and copper mesh to keep them out. Check all the seals and weatherstripping around your doors, windows, and on your roof, re-caulking as necessary to make them airtight, and patch up sections of torn window screens with new screen material. The gardener in you may enjoy the flourishing look of your plants, trees, and shrubs fully grown out, but if they’re touching your home’s siding or roof, it’s basically a highway express lane for pests headed indoors. Trim all landscaping away from your home to limit pest traffic and reduce your chances of them causing damage to your home.

Image Source: Getty Images – Image Credit: StepPro
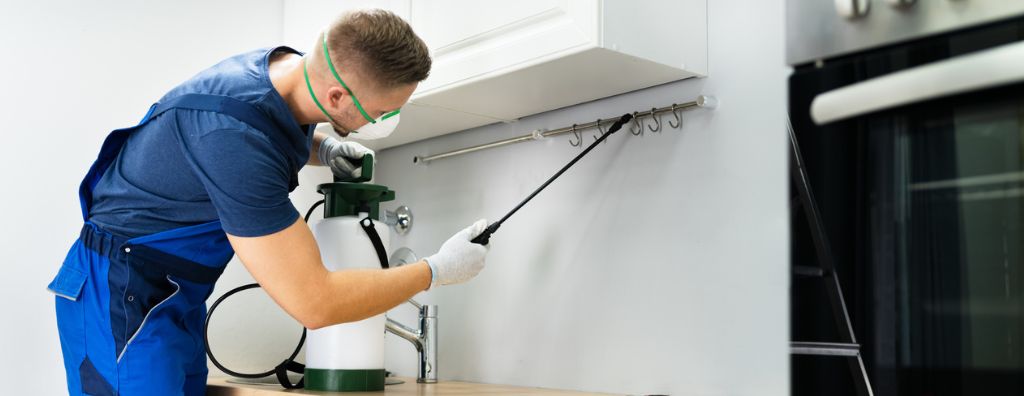
DIY Pest Control
Extra garbage, leftover food, and plumbing leaks will attract pests. Regularly take out your trash and dispose of compostable food scraps to keep the bugs at bay. If a leak springs, it’s like a magnet for certain pests looking to capitalize on the damage. This emphasizes the importance of taking steps to prevent water damage in your home and quickly repairing leaks when they happen.
- If you plan to use pesticides in your home to deter ants, bugs, and other pests, do so safely. Visit the Environmental Protection Agency (EPA) online for tips on how to correctly use pesticides in your home.
You can also use common pantry items to deter pests. A mixture of water and an essential oil like peppermint, lemon grass, or cedarwood sprayed along windows and doorways is a natural way to repel bugs. A little apple cider vinegar with dish soap in a small cup will help you attract and catch fruit flies, whipping up a quick white vinegar-and-water mixture will quickly clean up messes pests leave behind, and the strong smell of coffee grounds is powerful enough to stop them in their tracks. Learn more about how these food products can help you get your home sparkling clean:
If pests have gotten in your home and started causing damage, it very well may be too late for DIY preventative measures like these. In these situations, it’s best to contact a local licensed professional to exterminate as needed. Depending on the extent of the damage, you may be temporarily displaced from your home. Be sure to plan ahead if that’s the case.
For more information on home maintenance, read the following blog post on preventing mold growth:
How to Prevent and Deal with Mold
Featured Image Source: Getty Images – Image Credit: AndreyPopov
Home Security and Safety for the Holidays

The holiday season can bring joy and peace, but it can also bring package thieves and burglary. Stay safe this winter by taking a few precautions with your home security. From old-school security tricks to new digital home monitoring tools, there are many options when it comes to keeping our homes safe and preserving that sensibility.
How to Winterize Your Waterfront Property

After the long days of summer have come and gone and fall is ending, it’s time to begin preparations for winterizing your home. When temperatures begin to dip, your lakeside cabin, seaside cottage or mountain lodge will need some extra TLC to make it through the colder months until spring comes around again. Whether your waterfront property is your vacation home or a primary residence, it’s important to properly winterize it in order to avoid potential damage and to save you time and money.
How to Winterize Your Waterfront Property
Pipes and Plumbing
Burst pipes are often the cause of water damage. Prevent a water damage emergency at your waterfront property this winter by being proactive.
If your waterfront home is your summer getaway, then disconnect your hoses from outside pipes to prevent them from freezing and breaking. If you plan to turn the heat off for the winter, turn off your main water supply and open your faucets. Any water left in your hoses can cause damage, so be sure to drain the hoses connected to your dishwasher, washer, and any other appliances.
If you’ll be calling your waterfront property home for the winter, thoroughly inspect the insulation for both your interior and exterior pipes. Any areas where insulation is lacking could lead to a cracked pipe, which has the potential to cause serious damage and could end up costing a significant amount of money to repair.
Roof and Gutters
Properly winterizing your roof and gutters will help to avoid a buildup of rain, snow, or debris turning into a structural issue. For homeowners with a shingle roof, this is the time to check your roof for any signs of damage and make repairs accordingly. Cracked shingles can be carried off by high winds, torn off in a winter storm, or may fall to the ground after being struck by a fell branch, leaving your roof vulnerable to leaks.
This is especially important if you will be away from your waterfront property all winter. Since you won’t be around, you may not be aware that your roof has been damaged until it’s too late.
For metal roofs, check to make sure everything is screwed down tight. Clear your gutters of leaves and debris. The heavier your gutters become, the more prone they are to leaks, and could potentially rip away from your roof. Keep your gutters clear throughout the winter. Any blockages of leaves, twigs, or ice could lead to a leak, damaging your walls and insulation.
Other Areas
Once your plumbing, pipes, roof, and gutters are properly winterized, look to other areas of your property to prepare for the winter ahead. Check all windows and doors to identify any air leaks. If you identify a leak, be sure to patch it before you take off for the winter—or if you’re staying in the home for the season, before temperatures start to dip. Inspect your home’s insulation and weatherstripping and make replacements as needed.
Bring your patio furniture inside and store them in a safe space to keep them in good condition until spring. Inspect your boat lift and dock. Consider investing in a bubbler or agitator system to keep ice away from your dock if you’re expecting freezing temperatures throughout the winter. Follow proper winterizing guidelines for your boat and any other watercraft you have before covering them or placing them in winter storage.
For more tips on home maintenance throughout the seasons and much more, visit the Living section of our blog.
5 Tips for Swimming Pool Maintenance
A swimming pool can turn a backyard into a grotto, an oasis, an at-home vacation spot. But to let the poolside good times roll, they require maintenance. Your local climate can often dictate how much you use your pool. For some homeowners, you may be swimming in your pool year-round. For others, the pool may be a summer ritual, only to close it up once fall temperatures start to plummet. No matter how often you use your pool, these tips will help you keep it in tip-top shape.
5 Tips for Swimming Pool Maintenance
1. Keep Your Pool Water Balanced
A well-balanced pool maintains the correct levels of chemicals and, through filtration and disinfection, avoids having to change the pool water year after year. The main levels of concern are pH, total alkalinity, chlorine levels and calcium hardness. Aim to keep these levels within the following parameters:
- pH: 7.2 – 7.8
- Total alkalinity: 80 – 120 ppm
- Chlorine levels: 1 – 3 ppm
- Calcium hardness: 180 – 200 ppm
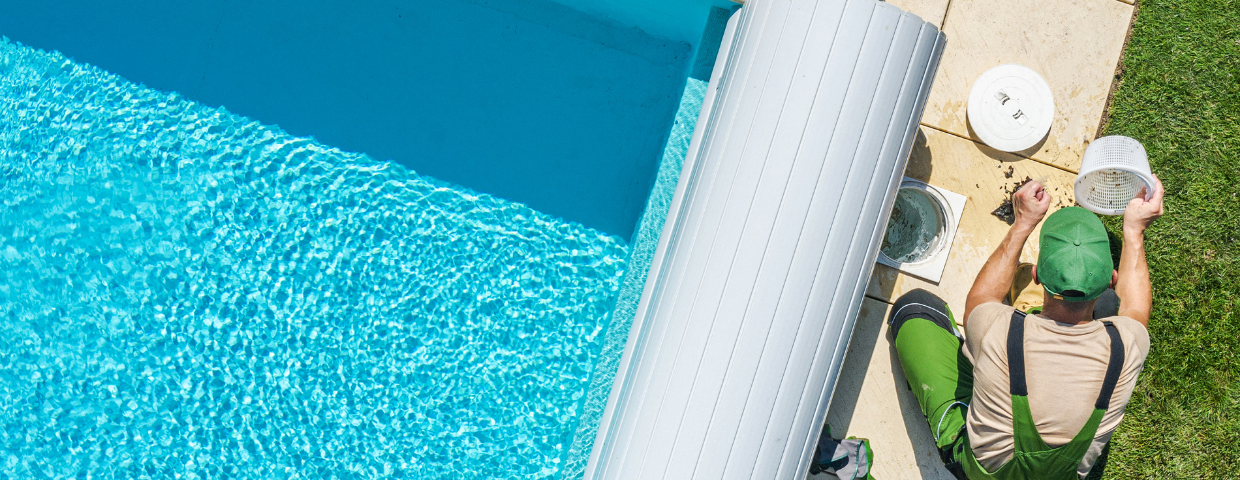
2. Routine Cleaning
Regardless of the season, keeping your pool water crystal clear requires routine cleaning. Weekly tasks include vacuuming, backwashing the pool filter, applying algaecide and chlorine, and cleaning the skimmer baskets. Running the circulation system is a daily task, which keeps the pool water fresh. Pool walls are a commonly missed cleaning spot. Brush them routinely to prevent algae growth and to eliminate chemical buildup.
3. Closing Your Pool
If you don’t use your pool year-round, you’ll have to go through the steps of proper decommission to avoid any hang-ups when it’s time to open it back up. Stow all equipment including ladders, lights, and thermometers before cleaning and vacuuming the pool. After you’ve balanced the pool water, let the system run for up to twenty-four hours before adding winterizing chemicals. Once the chemicals have run through for a few hours, remove the pool equipment, and drain. Finally, cover your pool to protect it from debris during the offseason.
4. Opening Your Pool
For those who user their pools seasonally, the day you reopen your pool is cause for celebration. But before you draft up any pool party invitations, you’ll need to give it some TLC. If you use a removable pool cover be sure to store it in a safe, protected place. Fill the pool back up to the maximum fill line and clear any debris from the water’s surface. Once you’ve tested the water and properly balanced the levels, remove any winterizing plugs to get water flowing into the plumbing system again. Once you’ve tested all systems to make sure the water is being properly heated and pumped, cleaned the walls, vacuumed the floor, there’s only one thing left to do—cannonball!
5. Pool Offseason
Even when your pool is not being used it requires a watchful eye. Besides keeping your pool ready for when you open it back up, offseason maintenance will help to avoid any major repairs due to neglect. Check your pool water occasionally. Even if your pool is covered, it’s possible for leaves, sticks, and needles to make their way inside. Continue to monitor the balance of your pool water by checking the levels weekly and adjusting as needed. Check the pump, heater, and plumbing for any signs of damage and clean the filter regularly.
For more information on keeping your home and the systems in it well-maintained, read more on our blog:
Preparing Your Home for Summer Heat and Wildfires

Summer is the season for spending long days in the yard, taking dips in the pool, and sitting in the shade to beat the heat. In the midst of these sun-filled adventures, though, lies the potential for heat waves, smoke, and wildfires. Every homeowner should be ready for these emergencies as well as the damaging effects they can have on their home. The following information will help you prepare your home for the hottest days of the year.
Preparing Your Home for Summer Heat
As temperatures soar, it’s important to make sure that your methods of cooling your home are as effective as possible. Adding insulation may not be the first thing that comes to mind when prepping your home for the summer heat, but it will help prevent cool air from leaking outside and hot air from entering. If your insulation is out of date, now is the time to make replacements as needed. Windows are another culprit for air leaks, which commonly form between the window frame and the frame of the house. Fill these cracks with caulking between the frame and the exterior siding. If your windows are exposed to prolonged periods of direct sunlight, consider placing an awning or screen shades above the exterior side to provide some relief from the radiating heat.
Air conditioning can be a lifesaver during summer. There are two main options when it comes to air conditioning: either a window unit or central cooling. Window units are the least expensive option and offer portability. It’s important to choose a unit that is the right size for your home or the room you’re trying to cool. One that’s too big will quickly cool your space and then shut off completely. This can increase your energy bills and put unnecessary wear on the unit. An undersized unit simply won’t cool your home and will constantly run to try to reach the target temperature. With central air conditioning, homeowners can expect much higher startup costs. But once installed, central AC provides short- and long-term comfort and adds to your home’s value.
Summer is a good time to check your HVAC unit’s air filters. Turn the unit off before performing any maintenance. If any devices that give off heat are close enough to the thermostat that regulates the AC, they could generate an incorrect reading, which could throw off your air conditioning efficiency. For maximum efficiency, place these devices away from the thermostat.
Preparing Your Home for Wildfires
The first step in preparing your home for wildfires is to have an emergency plan. Make sure everyone in your household is aware of what to do in the event of a wildfire. Pack an emergency kit to bring with you in the event of an evacuation. For homeowners who live outside a fire zone, consider buying an air purifier to protect yourself from smoke.
To give yourself the best chances of keeping wildfires from getting too close to your home, keep all flammable objects away from the house, preferably at least thirty feet. Clear your gutters of debris such as leaves, twigs, sticks, and the like. These materials are tinder for fire. Any flammable vegetation within five feet of the home should be cleared away, and any trees that overhang close to the home should be cut back to a distance of ten feet. Remove any dead plants or vegetation from your yard and keep your lawn short. Install mesh screens over exterior vents to prevent embers from entering your home.
This may seem like a daunting list, but these preparatory measures are worth it to protect your home and loved ones this wildfire season. Once you’ve taken these steps, you can enjoy your summer days at home knowing you’re prepared.
6 Commonly Missed Cleaning Spots
It’s easy to get into a routine when cleaning your home season after season, year after year. While simply going over the same spots may make your home feel cleaner, at the same time, it allows the neglected areas to become dirtier. Here are six commonly missed spots around the home that, once given the attention they deserve, will help make your home feel completely clean.
6 Commonly Missed Cleaning Spots
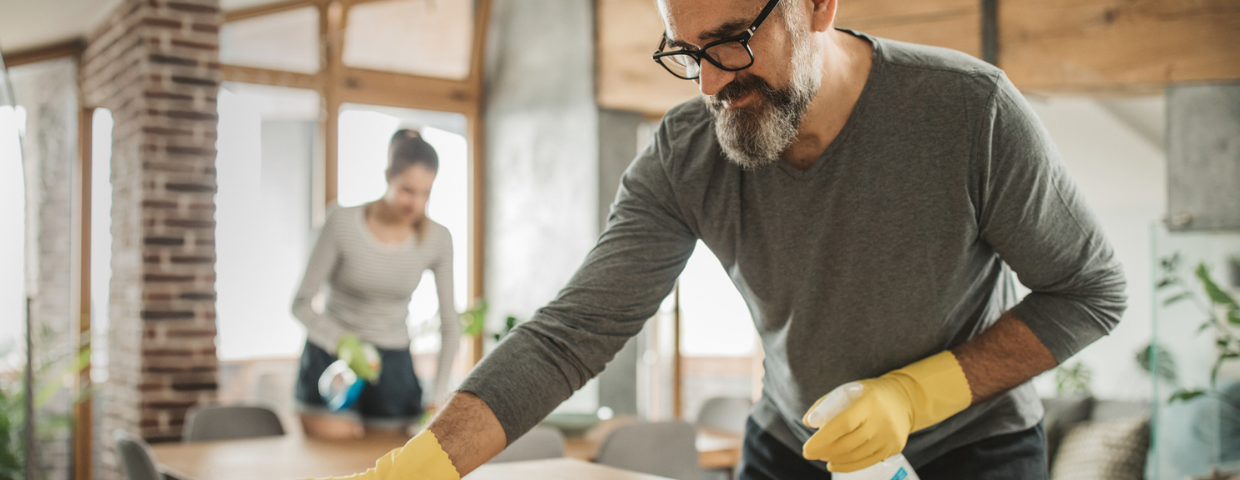
1. Underneath & Behind Furniture
Dirt and dust love to hide in tough-to-reach, tucked-away spots like behind your nightstand, under your bed frame, and on the underside of your tables, chairs, and couches. Cleaning these areas may require some heavy lifting and rearranging but it’s worth your while. If enough dust and grime have accumulated over the years that your vacuum can’t remove the buildup, try using a washcloth to loosen the sediment.
2. Vents and Fans
Vents and fans not only collect dust, but they also distribute it around your home. Ceiling fans are one of the hardest spots in your home to reach, so you may need to use a ladder and an extended duster to clean them. Clean your vent grates with a dusting brush or a wire brush depending on the thickness of the buildup. If your home has central air, remember to replace your air filters periodically. A clean ventilation system is key to protecting your home’s air quality.
3. Bathroom Surfaces
We all know the feeling of picking up a rarely used shampoo bottle in the shower to discover a grimy ring underneath it. Wipe off your bottles and surfaces in the shower to keep it sparkling clean. Scrub away the debris from your shower head and soak it in a mixture of water and white vinegar to cleanse the device and to prevent a buildup of mineral deposits. To reach behind the toilet, you may need knee pads and an extended cleaning tool. Use a disinfectant-water mixture to prevent the spread of germs. Tackling chores like these will help make your bathroom feel brand new in no time.
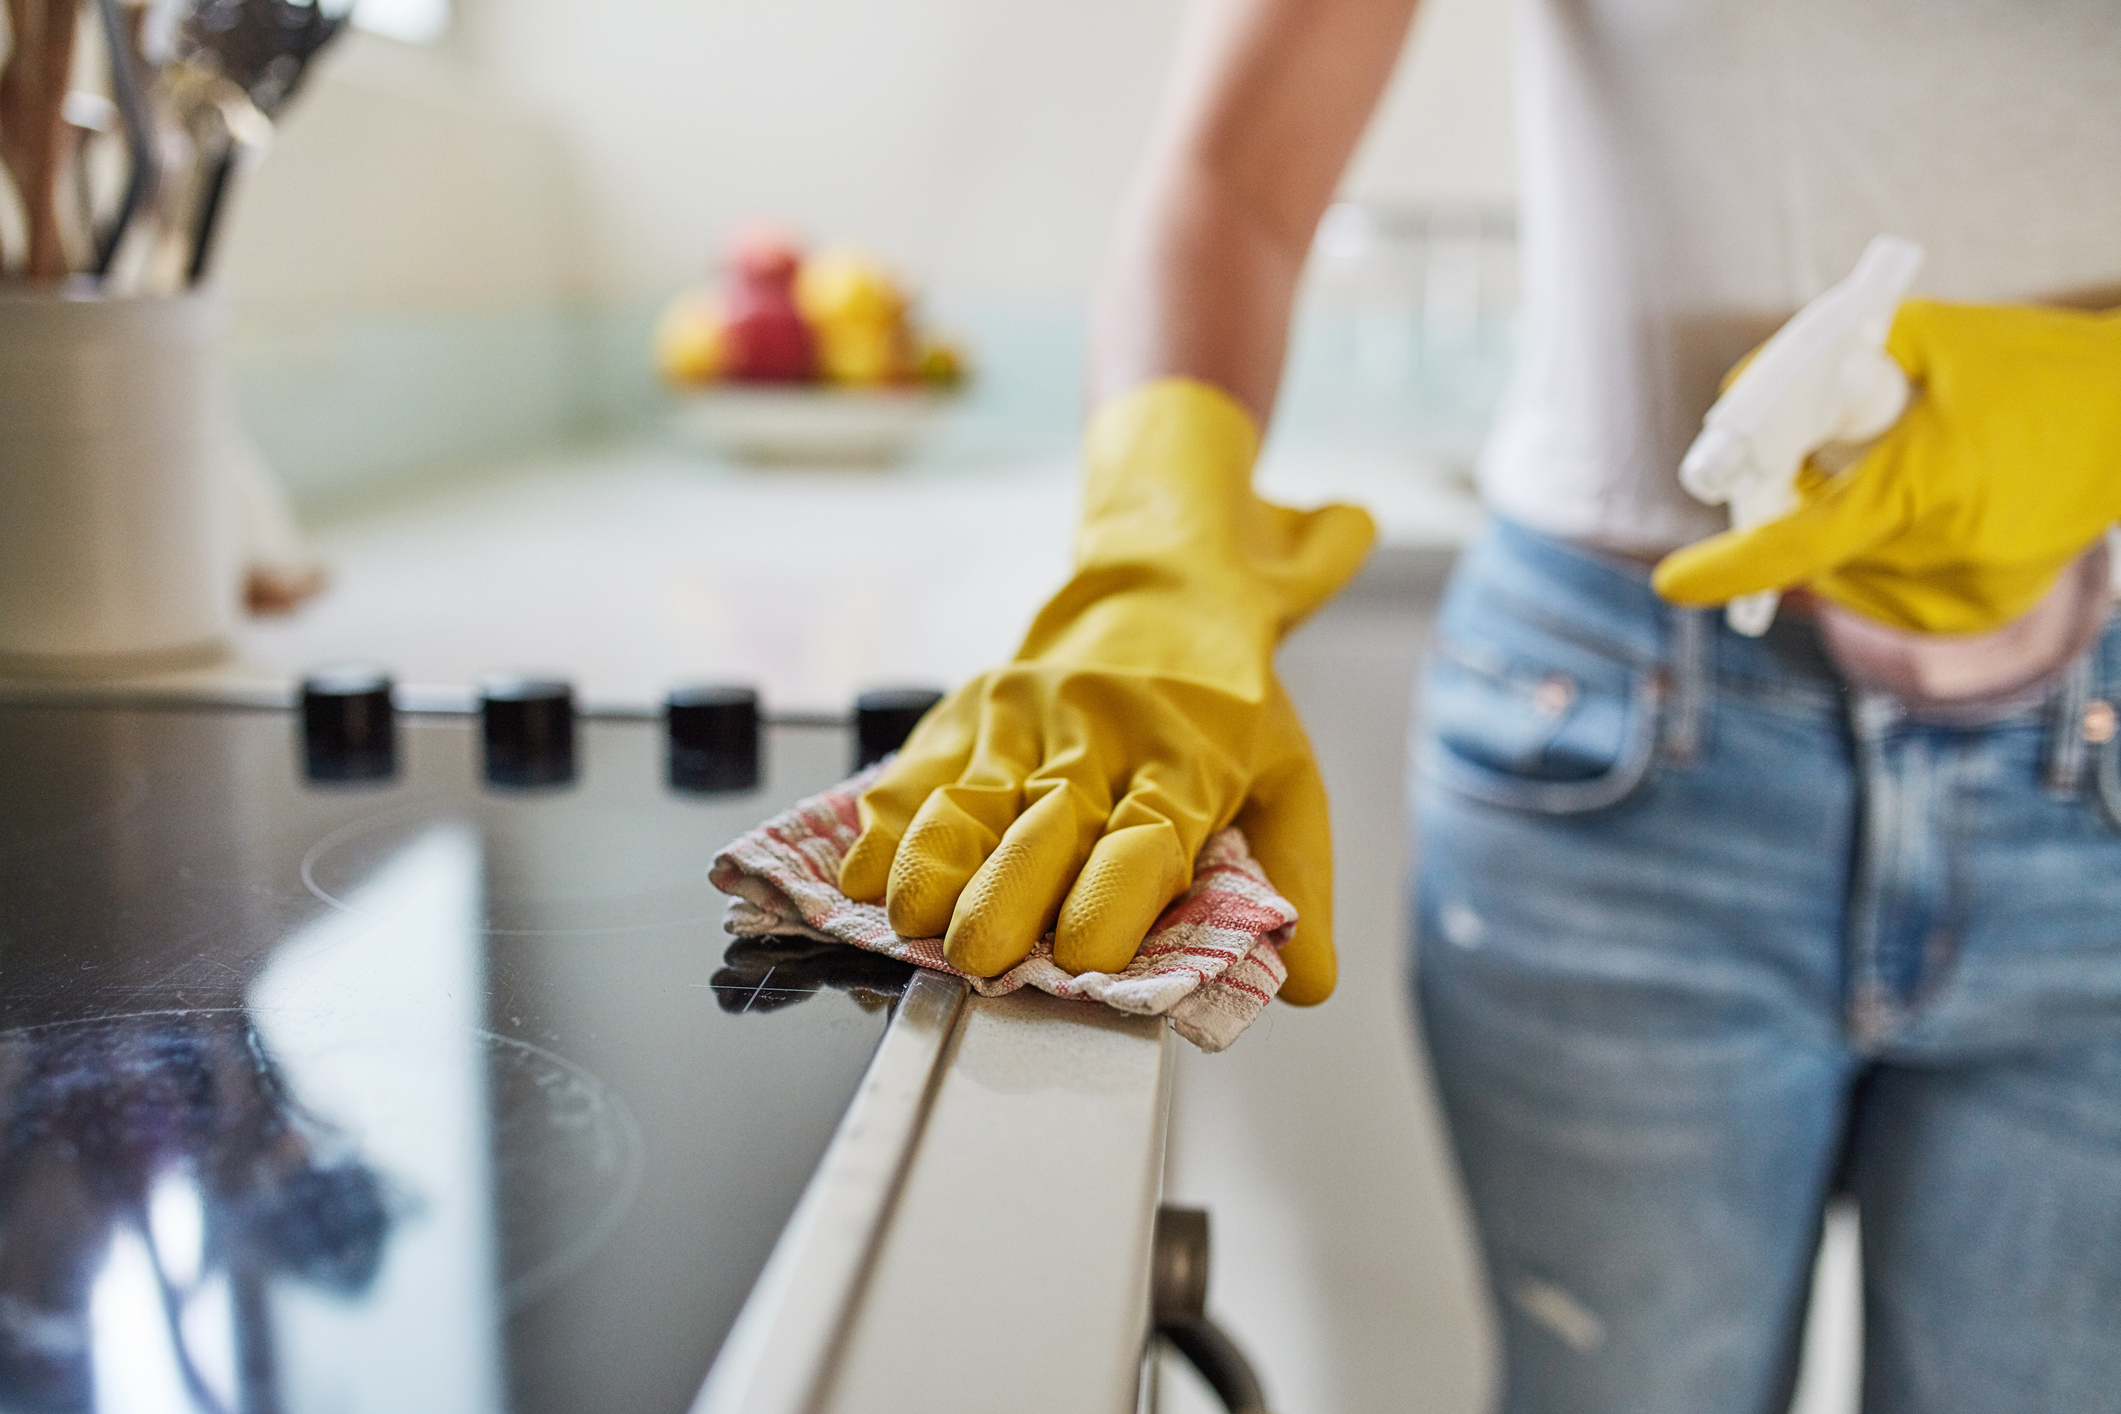
Image Source: Getty Images
4. Switches & Handles
Light switches, door handles, drawer pulls, and knobs are all hotbeds for germs and dirt and can easily be forgotten while cleaning your home. Take a two-step approach to cleaning these high-touch surfaces: first clean, then disinfect. Cleaning will get rid of contaminants, while disinfecting targets pathogens. The combination of the two will help make your home feel cleaner while reducing the spread of germs. Other high-touch surfaces such as keyboards, phones, tablets, and other devices require regular cleaning as well.
5. Appliances
It’s easy to think of your appliances strictly as devices that help your home stay clean and organized, but they are magnets for dirt and gunk, too. After cleaning out the refrigerator and scrubbing down the shelves, find the coils and clean them of debris with a vacuum or a brush. The floor underneath your refrigerator can be a seriously grimy spot, so a quick mop of that area is worth your while. Give your dishwasher a good cleanse to prevent mold buildup and bad odors. Remember to clean out the filter occasionally with soap and water. Cleaning your appliances routinely can help avoid repairs and can even extend their life expectancy.
6. Baseboards
Baseboards are the perfect settling point for dirt and dust. The space between your walls and floors is an easy trap for buildup, and upon closer inspection, you’ll find some combination of scuffs, dust, food remnants and scratch marks. To thoroughly clean your baseboards, you may need to move your furniture away from the walls but be careful not to scratch the floor or damage the baseboards. Wipe away the dust before cleaning the surface. Use either a mix of soap and water, water and vinegar, or the proper wood cleaner for wooden baseboards.
For more information on cleaning your home, seasonal maintenance, and more, visit the Living section of our blog.
Your Winter Home Maintenance Checklist
Winter is a magical season to spend at home. We all want to be able to enjoy the shorter days and longer nights from the comfort of our homes while we watch the season change.
To truly enjoy this winter at home with peace of mind, you’ll want to complete a home maintenance checklist to prevent unexpected costs, ensure your family’s safety and warmth, and keep your home in the best shape for the winter season ahead.
1. Weatherproof Windows & Doors
One of the best preparatory measures you can take to keep the cold from infiltrating your home is to weatherproof your windows and doors. Any leaks or cracks could lead to a chilly household and increased heating costs. Either weatherstripping or caulking will do the trick for minor leakage issues, but for any severe problems you may want to consider a replacement.
2. Protect Your Pipes from Freezing
Burst pipes can be disastrous regardless of the season, but winter temperatures pose a greater risk than any other time of the year. Be sure to wrap interior pipes to provide them some insulation against the change in temperature. You’ll want to bring all hoses inside but remember to turn off your exterior water source before you do.
3. Prepare for a Winter Storm
Being fully prepared for the winter ahead includes completing both preventative home maintenance and disaster preparedness tasks. Keep a supply of flashlights and batteries handy in case a power outage should occur. If you have a fireplace, stock up on firewood so you’ll have plenty of fuel for your heat source. It’s best for your family to put together an emergency kit and evacuation plan so you’re prepared for any local weather emergencies.
4. Chimney Sweep and Fireplace Maintenance
We become more reliant on fireplaces, wood burning stoves, and chimneys to heat our homes during the winter. Accordingly, it’s crucial to prepare for the uptick in their usage. Clear out your air vents before your daily fires begin. When your fireplace is not in use, be sure to close the damper to save energy. Clogged chimneys can lead to house fires and carbon monoxide poisoning. Investing in a chimney sweep can save you money in the long run, while avoiding health scares.
5. Clean Out Your Gutters
After all the leaves, pinecones, pine needles, and other autumnal debris have fallen, it’s best to clean out your gutters in preparation for winter. By keeping your gutters clean you’ll avoid gutter damage from melted snow draining improperly. Make sure your downspouts are pointing away from your home’s foundation to prevent basement leaks and flooding.
6. Heating System Maintenance
Keeping up on your heating system’s efficiency is an integral part of winter home maintenance. If you use a furnace, be sure to clean out your air filters and ducts, making replacements as needed. Covering your HVAC system can help to prevent damage from any debris or moisture getting in. To protect against heat loss, seal your ducts with mastic tape or foil tape.
7. Reverse Your Ceiling Fans
If you have ceilings fans in your home, there is a handy trick you can use to improve your home’s heating efficiency. By reversing the direction of your ceiling fan—running the blades in a clockwise direction—you’ll create a slight updraft, forcing warm air near the ceiling downward.
8. Bring Your Plants Inside
The winter season usually spells trouble for your potted plants. However, there are methods to keep them alive indoors through the winter months. You’ll want to provide continual air circulation, so keep a fan blowing in the direction of the plants. It’s best to mirror the conditions the plants will face outdoors, so you can afford to keep watering to a minimum. Since it is a harsher season, keep a close eye on your plants as the winter progresses.
After your checklist is completely crossed off, you’ll be able to kick back, relax, and enjoy your winter at home in comfort knowing your home is primed and ready for the winter season ahead.
")


